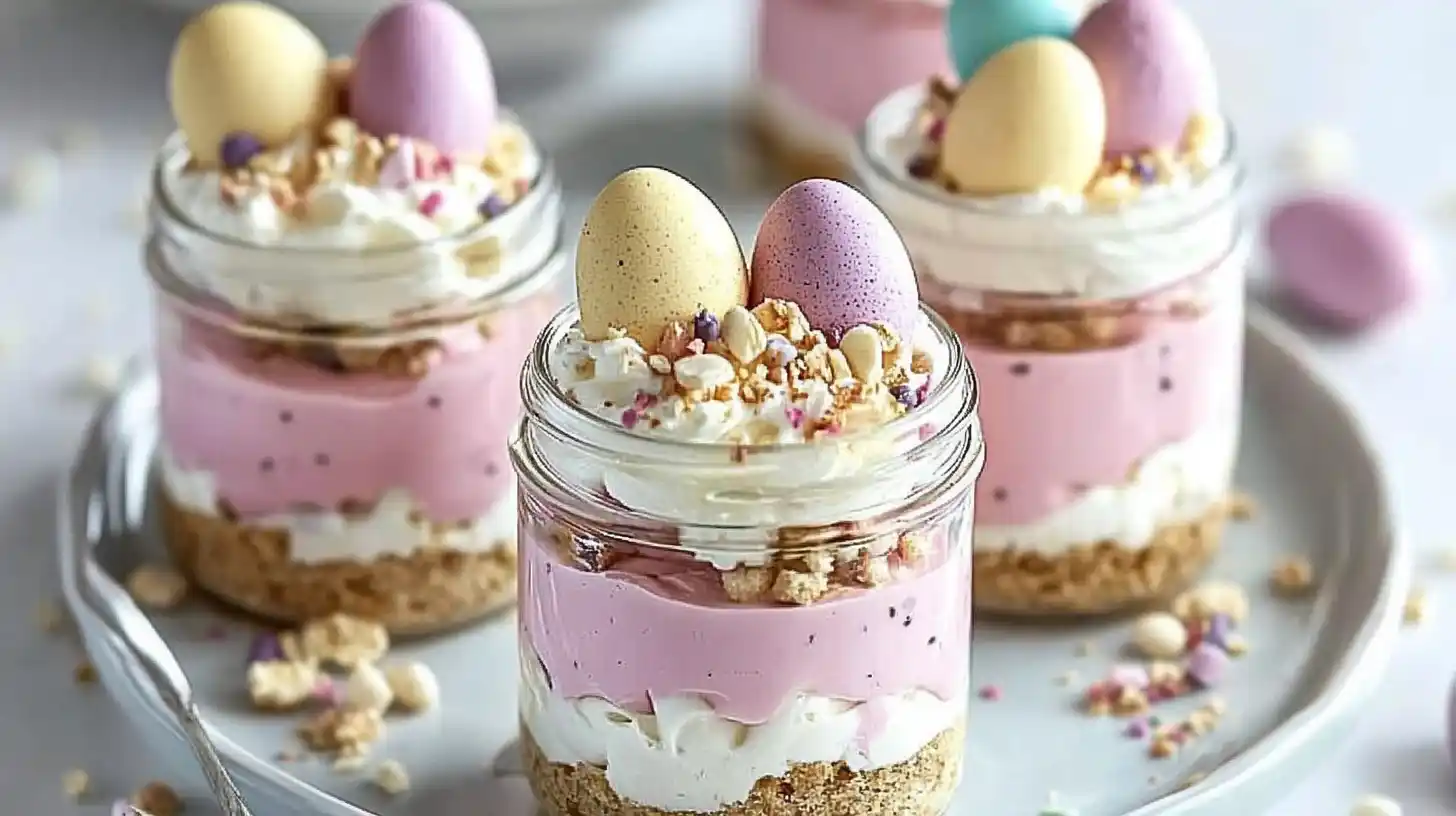
These adorable Easter Egg Cheesecake Jars are the ultimate no-bake treat that brings joy to every spring celebration. Layered with creamy cheesecake filling, crushed cookies, and vibrant pastel colors, each jar is a delightful surprise of texture and taste. They’re easy to make, fun to assemble, and perfect for kids and adults alike.
Why You’ll Love This Recipe
These cheesecake jars aren’t just cute—they’re incredibly delicious. With no oven time and just a few simple ingredients, they come together in under 30 minutes. They make the perfect Easter dessert or springtime party treat. The jars are easy to serve, easy to transport, and full of bright, happy colors that match the festive mood.
Pure Comfort
There’s something undeniably cozy about a layered dessert in a jar. The creamy cheesecake, the crunch from the cookie base, and the smooth whipped topping come together like a dessert hug. These jars are comfort food disguised as a Pinterest-worthy Easter centerpiece.
Ingredients
For the crust:
- 1 cup graham cracker crumbs (or digestive biscuits)
- 2 tablespoons melted butter
For the cheesecake filling:
- 8 oz cream cheese, softened
- 1/2 cup powdered sugar
- 1 teaspoon vanilla extract
- 1 cup whipped topping (like Cool Whip)
For coloring:
- Food coloring in pastel shades (pink, yellow, purple, blue)
Toppings:
- Mini chocolate eggs
- Easter sprinkles
- Whipped cream (optional)
What You Need
- Mixing bowls
- Electric mixer or whisk
- Mason jars or small dessert jars
- Spatula
- Piping bags (optional for neater layers)
- Food coloring
Time to Cook
You won’t need to turn on your oven at all. Just 15 minutes to prep and 15 more to assemble—plus a chill time of 1 hour if you want them firmer.
Steps to Make It
1. Make the crust
Crush your graham crackers into fine crumbs and mix with melted butter until it resembles wet sand. Press a spoonful into the bottom of each jar to form the base.
2. Whip the filling
In a bowl, beat cream cheese, powdered sugar, and vanilla until smooth. Fold in the whipped topping gently to keep the mixture light and fluffy.
3. Color the layers
Divide the cheesecake filling into four small bowls. Add one drop of food coloring to each bowl to create pastel shades—mix until the color is even.
4. Layer it up
Spoon or pipe each colored filling into the jar over the crust. Use a small spoon or piping bag for cleaner layers. Repeat with all colors for a rainbow effect.
5. Chill (optional)
Place jars in the fridge for about 1 hour if you prefer a firmer texture, or serve immediately for a softer, mousse-like bite.
6. Top it off
Decorate each jar with mini chocolate eggs, sprinkles, and a swirl of whipped cream if desired.
Make It Perfect
Use gel food coloring for vibrant pastels without watering down the filling. Always soften your cream cheese fully to avoid lumps. Chill the jars to help the flavors meld and the texture set.
Mix It Up
Swap graham crackers for crushed Oreos or gingersnaps for a spiced twist. Try flavor extracts like almond or lemon instead of vanilla. Add fruit puree to the filling for a fresh-fruit cheesecake variation.
Perfect Partners
These jars pair beautifully with hot cross buns or a simple spring salad for brunch. Serve alongside lemon bars or carrot cake cupcakes for a full dessert table.
Busy Day Hero
Make the jars a day in advance and store them in the fridge with the lids on. Pull them out just before serving—instant party perfection.
Work Ahead
Both the crust and cheesecake layers can be prepared a day or two in advance. Store them separately and assemble on the day of your gathering for best presentation.
Save Some For Later
These jars keep well in the refrigerator for up to 3 days. Cover them tightly or add the jar lids. Avoid freezing, as the texture of the cheesecake may change.
Everyone’s Happy
Kids love the bright colors and candy eggs, while adults appreciate the rich, creamy taste. These jars are portion-controlled and easy to serve—no slicing needed.
Good For You Too
While not exactly diet food, you can lighten these up with low-fat cream cheese and sugar-free whipped topping. Use natural food dyes or beet juice for color if you’re avoiding artificial colors.
Easy Clean Up
Because everything’s made in jars, there’s no need for pans or molds. Plus, fewer dishes means more time enjoying your guests. Cleanup is as easy as rinsing a spoon and a bowl.
Switch It Up
Skip the layering and swirl the colors for a tie-dye effect. Add crushed Easter candy to the filling for extra crunch. Use reusable jars or even clear plastic cups if you’re serving a crowd.
Simply Perfect
No-bake, colorful, and absolutely adorable—these Easter Egg Cheesecake Jars are a stress-free way to impress. They’re ideal for parties, potlucks, or a cozy spring afternoon at home.
FAQs
1. Can I make these ahead of time?
Yes, they keep well in the fridge for up to 3 days. Just add toppings right before serving.
2. Can I freeze cheesecake jars?
Freezing isn’t recommended as the texture can change, but they can last chilled in the fridge.
3. What jars should I use?
Small 4-oz mason jars or dessert cups work perfectly for individual portions.
4. Can I use store-bought crust mix?
Absolutely! Just prepare according to package directions and layer as usual.
5. How do I get clean layers?
Use a piping bag or small spoon and clean the edges of the jar with a damp paper towel as you go.
6. Can I make these dairy-free?
Yes! Use dairy-free cream cheese and whipped topping for an allergy-friendly version.
7. What can I use instead of food coloring?
Try natural colors like beet juice, turmeric, or matcha for a wholesome twist.
Conclusion
Easter Egg Cheesecake Jars are the perfect combination of cute and delicious, offering a fun, festive, and fuss-free dessert option. Whether you’re hosting brunch, heading to a potluck, or simply looking for a spring-themed treat, these jars are guaranteed to bring smiles all around. They’re easy to make, easy to serve, and impossible to resist.
More Colorful & Creamy Easter Desserts You’ll Love
If you had fun crafting these Easter Egg Cheesecake Jars, you’ll definitely want to try more playful and pastel-perfect treats! Start with a soft and charming bake like the Fluffy Bunny Buns—ideal for brunch baskets or kid-friendly spreads. For a vibrant layered dessert, the St. Patrick’s Day Brownie Trifle can be adapted with Easter colors and candy toppings. Add some handheld sweetness with the chewy Easter Jello Cookies, or bring some whimsy to your dessert table with colorful Rice Krispie Easter Eggs. And for a creamy indulgence with nostalgic flair, don’t miss the Dreamy Orange Creamsicle Pie—refreshing, chilled, and perfect after a spring meal.
Print
Easter Egg Cheesecake Jars
- Total Time: 15 minutes
- Yield: 7 jars 1x
- Diet: Vegetarian
Description
These no-bake Easter Egg Cheesecake Jars are the perfect pastel-colored treat layered with creamy cheesecake filling, buttery cookie crust, and festive toppings—ideal for spring gatherings and Easter celebrations.
Ingredients
For the Crust
-
1 cup graham cracker crumbs (or digestive biscuits)
-
2 tablespoons melted butter
For the Cheesecake Filling
-
8 oz cream cheese, softened
-
1/2 cup powdered sugar
-
1 teaspoon vanilla extract
-
1 cup whipped topping (like Cool Whip)
For Coloring
-
Food coloring in pastel shades (pink, yellow, purple, blue)
For Toppings
-
Mini chocolate eggs
-
Easter sprinkles
-
Whipped cream (optional)
Instructions
-
Prepare the Crust
Combine the graham cracker crumbs and melted butter in a bowl. Stir until evenly moistened. Press a layer into the bottom of each jar to form the crust base. -
Make the Cheesecake Filling
Beat softened cream cheese with powdered sugar and vanilla extract until smooth and creamy. Gently fold in the whipped topping until fully incorporated. -
Color the Filling
Divide the cheesecake filling into four small bowls. Add a few drops of different food coloring to each bowl and mix until pastel shades are achieved. -
Layer the Jars
Spoon or pipe alternating colored layers of cheesecake filling over the crust in each jar. Continue layering until jars are full. -
Chill the Jars
Place jars in the fridge for at least 1 hour to allow the cheesecake to set. This also helps the flavors meld. -
Add Toppings and Serve
Before serving, top each jar with mini chocolate eggs, sprinkles, and a dollop of whipped cream for a festive finish.
Notes
For more vibrant colors without thinning the mixture, use gel food coloring. Soften cream cheese fully to ensure a lump-free filling. You can prepare jars 1–2 days in advance and add toppings just before serving.
- Prep Time: 15 minutes
- Cook Time: 0 minutes
- Category: Dessert, Easter
- Method: No-Bake
- Cuisine: American
Nutrition
- Serving Size: 1 jar
- Calories: 330
- Sugar: 20g
- Sodium: 180mg
- Fat: 21g
- Saturated Fat: 12g
- Unsaturated Fat: 8g
- Trans Fat: 0g
- Carbohydrates: 30g
- Fiber: 1g
- Protein: 4g
- Cholesterol: 35mg
Keywords: Easter Egg Cheesecake Jars, No-Bake Easter Dessert, Cheesecake in a Jar, Spring Dessert, Mini Cheesecake Jars, Festive Cheesecake