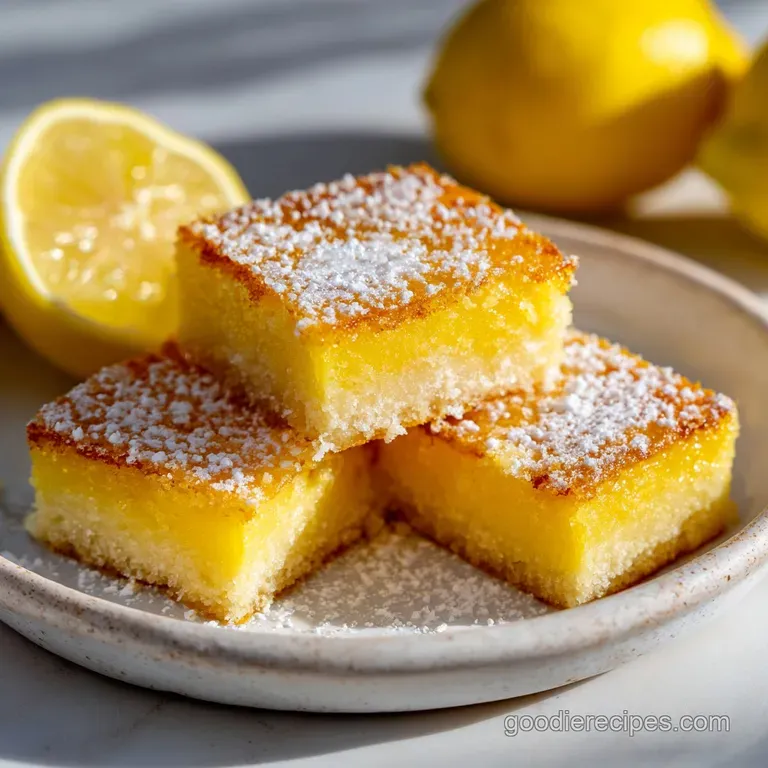
Lemon Bars with Cake Mix and Cream Cheese
- Time: Active 10 mins, Passive 25 mins, Total 35 mins
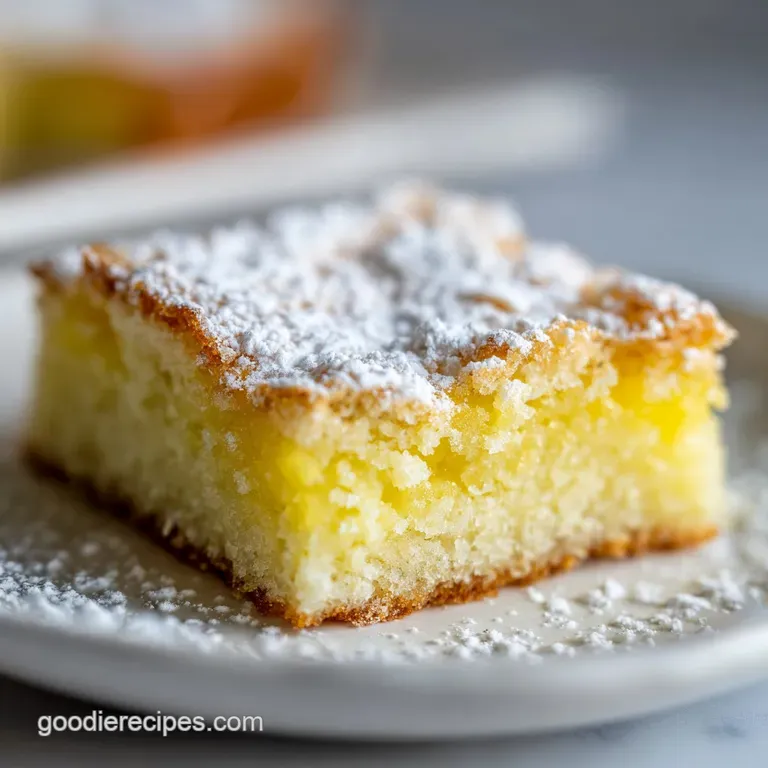
- Flavor/Texture Hook: A shatter crisp crust topped with a velvety, neon bright lemon center
- Perfect for: Last minute bake sales, busy weeknight treats, or beginner bakers
- Create a Zesty Masterpiece: Easy Lemon Bars with Cake Mix
- Unlocking Secrets to a Flaky Shortcut Crust
- Precision Checkpoints for The Best Lemon Bars
- Choosing Components for a Velvety Filling
- Minimal Tools Needed for Citrus Flavor
- The Foolproof Method for Layering Bars
- Expert Solutions for Common Baking Issues
- Creative Variations for Citrus Lovers
- Smart Strategies for Storage and Freshness
- Elegant Ways to Garnish Your Dessert
- Debunking Shortcut Baking Beliefs
- Recipe FAQs
- 📝 Recipe Card
Create a Zesty Masterpiece: Easy Lemon Bars with Cake Mix
We've all been there. You have guests coming over in forty minutes, the fruit bowl is looking a bit sad, and your energy for a from scratch curd is basically zero. The first time I tried making these, I was actually hiding the cake mix box in the recycling so my mother in-law wouldn't see it.
I thought it was "cheating." Then I pulled the pan out of the oven, and that sharp, sunshine bright aroma filled every corner of my kitchen. One bite of the flaky, buttery bottom and the jammy topping, and I realized that nobody cared if it started with a box.
The magic happens when you stop following the instructions on the back of the box and start treating the mix like a raw ingredient. We aren't making a cake; we’re engineering a concentrated citrus bar.
By keeping the moisture low in the base, we get a sturdy, cookie like foundation that stands up to the heavy filling. It's a trick I learned after too many "soggy bottom" disasters that left me scraping the pan with a spoon.
This version holds its shape, looks stunning on a platter, and has that signature tartness that makes your mouth water.
We're going to use the 15.25 oz Lemon Cake Mix as our primary engine here. It's already balanced with leavening and sugar, which saves us a ton of measuring. But the real secret is the addition of fresh lemon zest and juice.
That hit of acidity cuts right through the sweetness of the 21 oz Lemon Pie Filling and the richness of the softened cream cheese. It transforms a "convenience dessert" into something that tastes like you spent the morning squeezing a whole crate of fruit from the orchard.
Unlocking Secrets to a Flaky Shortcut Crust
The Protein Binding: The single egg acts as a structural glue, connecting the cake mix starches to create a dense, shortbread like texture rather than a light sponge.
Fat Saturation: Using 1/2 cup of melted butter instead of oil allows the fat to coat the flour particles, which inhibits gluten development and ensures a tender, crumbly bite.
Acid Stabilization: The lactic acid in the cream cheese reacts with the cornstarch in the pie filling, resulting in a velvety set that won't run when you slice it.
The Maillard Response: Even with a shortcut mix, the sugars in the base undergo browning at 350°F, providing a toasted, nutty contrast to the bright lemon topping.
| Method | Prep Time | Crust Texture | Flavor Profile |
|---|---|---|---|
| Traditional Scratch | 45 minutes | Very sandy/tender | Mildly buttery, low sweetness |
| Fresh vs Shortcut | 10 minutes | Crisp and sturdy | Intense lemon, caramelized edges |
| No Bake Version | 20 minutes | Soft/Cracker like | Creamy, lacks depth of toasted crust |
When we talk about choosing between the traditional route and the shortcut, it's really about the trade off between time and structural integrity. A scratch crust can be finicky and often shrinks in the oven if you don't chill it properly. This cake mix method is far more forgiving.
Because the mix already contains emulsifiers, it bonds with the melted butter almost instantly, giving you a reliable base every single time without the need for a pastry cutter or cold hands.
Precision Checkpoints for The Best Lemon Bars
To get those clean, professional looking squares, you need to hit specific markers during the process. If you’ve ever pulled a pan out and had the center jiggle like a bowl of soup, you know the frustration. These three checkpoints will ensure you never have to guess about doneness again.
- The Base Press: Use the bottom of a flat measuring cup to firmly pack the crust. It should look like a smooth, even sheet with no loose crumbs before it hits the heat.
- Internal Temperature: If you’re a nerd like me and use a probe, the center of the bars should reach 165°F (74°C) to ensure the egg and cream cheese have fully coagulated.
- The Cool Down: You must wait at least 2 hours before slicing. The starches in the lemon filling need to "retrograde," which is just a fancy way of saying they need to firm up as they lose heat.
| Component | Science Role | Pro Secret |
|---|---|---|
| 15.25 oz Lemon Cake Mix | Structural Frame | Use a brand with "pudding in the mix" for extra moisture. |
| 1/2 cup Unsalted Butter | Shortening Agent | Melt it until it just turns liquid; don't let it bubble or brown. |
| 1/2 cup Cream Cheese | Texture Stabilizer | Ensure it is completely soft to avoid white lumps in the yellow filling. |
| 1 tbsp Lemon Zest | Essential Oils | Grate directly into the bowl to capture the volatile citrus spray. |
Understanding the role of these ingredients helps you avoid the common pitfalls of "box" baking. For instance, the butter doesn't just add flavor; it’s the barrier that prevents the lemon filling from soaking into the crust and making it mushy. If you want to experiment with different flavors, these same principles apply. You could even swap things around for a spring themed treat. This recipe pairs beautifully with a fresh spread, much like you might find on an Easter Charcuterie Board recipe for a big family gathering.
Choosing Components for a Velvety Filling
When you're standing in the baking aisle, the options can be overwhelming. For the best result, stick to the 15.25 oz Lemon Cake Mix (Betty Crocker or Duncan Hines work great). Avoid the "sugar-free" versions for this specific recipe, as the chemistry of the crust relies on the real sugar to create that golden, crisp bottom.
The 1/2 cup (113g) of unsalted butter is non negotiable margarine has too much water and will lead to a greasy finish.
The 21 oz can of Lemon Pie Filling is our heavy lifter. Look for a brand that lists "lemon juice" high on the ingredient list rather than just "citrus flavor." To bridge the gap between "canned" and "homemade," we add 1 tbsp of freshly grated zest and 1 tbsp of fresh juice.
It’s that tiny bit of extra effort that confuses people into thinking you made the curd from scratch.
- 1 box Lemon Cake Mix: The foundation. Why this? Provides the perfect ratio of flour and sugar for a shortbread base.
- 1/2 cup Unsalted Butter: The fat source. (Sub: Salted butter, but skip any extra salt pins).
- 1 Large Egg: The binder. (Sub: 1/4 cup plain Greek yogurt for a tangier, softer base).
- 21 oz Lemon Pie Filling: The body. Why this? Offers a consistent, jammy texture that sets predictably.
- 1/2 cup Cream Cheese: The stabilizer. (Sub: Mascarpone for a richer, less tangy finish).
- 1 tbsp Lemon Zest: The aroma. Why this? Adds high note citrus oils that canned filling lacks.
- 1 tbsp Lemon Juice: The brightener. (Sub: Lime juice for a "citrus splash" flavor).
- 1/4 cup Powdered Sugar: The garnish. (Sub: Granulated sugar for a crunchier top).
Minimal Tools Needed for Citrus Flavor
I’m a firm believer that you don't need a thousand dollar kitchen to make world class food. For these lemon bars, we are keeping it incredibly lean. You won't even need a stand mixer if you don't want to wash those heavy beaters. A simple glass bowl and a sturdy spatula are enough to get the job done.
You’ll need an 8x8 inch or 9x9 inch baking pan. I prefer metal pans for bars because they conduct heat faster, creating those coveted crispy corner pieces. If you use glass, just keep in mind that it holds heat longer, so you might need to pull the bars out a minute or two early to avoid over baking the edges.
- Mixing Bowls: One medium for the crust, one small for the filling.
- Microplane: For zesting that lemon without hitting the bitter white pith.
- Parchment Paper: This is the real "pro" tool. Leave an overhang on the sides so you can lift the entire block of bars out once they are cool.
- Whisk or Fork: To ensure the cream cheese is fully integrated into the lemon filling.
- Flat Bottomed Cup: To press the crust into the corners of the pan with even pressure.
The Foolproof Method for Layering Bars
Right then, let's get into the actual rhythm of the bake. The house is about to smell like a citrus grove, and it's the best part of the whole process. Ensure your oven is preheated to 350°F (180°C) before you even open the cake mix box. If you're looking for another fruit based dessert to master once you've nailed this one, you should definitely try a Blueberry Pie Recipe for your next weekend project.
- Prep the Pan. Line your 9x9 pan with parchment paper, leaving a 2 inch overhang on two sides. Note: This prevents sticking and allows for easy removal.
- Combine Crust. Stir together the Lemon Cake Mix, 1/2 cup melted butter, and the egg in a bowl.
- Press Foundation. Transfer the crumbly dough to the pan and press firmly until a smooth, solid layer forms.
- Blind Bake. Slide the crust into the oven for 10 minutes until the edges just begin to turn pale gold.
- Prepare Filling. While the crust bakes, whisk the 21 oz lemon pie filling with the 1/2 cup softened cream cheese, lemon zest, and juice.
- Smooth and Whip. Continue whisking until the filling is velvety and no white streaks of cream cheese remain.
- Layer Up. Pour the filling over the hot, pre baked crust and spread it evenly to the corners.
- Final Bake. Return the pan to the oven for 15 to 20 minutes until the edges are set and the center barely wobbles.
- Cool Completely. Remove from the oven and let the pan sit on a wire rack for 1 hour, then refrigerate for another 1 hour.
- Garnish and Slice. Dust with 1/4 cup powdered sugar until the top is evenly coated in a snowy layer.
Expert Solutions for Common Baking Issues
Even with a shortcut recipe, the oven can be a fickle beast. I remember the first time I made these for a neighborhood potluck and the center was so liquidy it looked like I was serving lemon soup. I had to pivot and tell everyone it was a "lemon cobbler dip." We don't want that for you.
Usually, the issue is either temperature or the moisture content of your cream cheese.
Why Your Crust is Too Crumbly
If your base is falling apart the moment you touch it, you likely didn't press it down hard enough or the butter wasn't fully incorporated. The mixture should feel like wet sand that holds its shape when squeezed in your palm. If it's too dry, add one extra teaspoon of melted butter next time.
Why Your Filling is Runny
A runny center usually means the bars were pulled out too soon. The cream cheese and egg need time to set. Another culprit is using "whipped" cream cheese instead of the block style. Whipped versions have too much air and not enough structural fat.
| Problem | Root Cause | Solution |
|---|---|---|
| Greasy Crust | Butter was too hot or over measured | Let melted butter cool for 5 mins; measure exactly 1/2 cup. |
| Bubbles on Top | Over whisking the filling | Tap the pan on the counter 3 times before baking to release air. |
| Tough Base | Over mixing the cake dough | Stop stirring as soon as the flour streaks disappear. |
Common Mistakes Checklist
- ✓ Soften cream cheese to room temperature (prevents lumpy filling).
- ✓ Don't skip the 10 minute blind bake (prevents a soggy bottom).
- ✓ Use the "sling" method with parchment paper (prevents the bars from breaking during removal).
- ✓ Wipe your knife with a damp cloth between every single cut (ensures clean, sharp edges).
- ✓ Always zest the lemon before you juice it (it's nearly impossible to zest a squeezed lemon).
Creative Variations for Citrus Lovers
While the standard lemon bars with cake mix are a classic, you can easily tweak this recipe to suit different dietary needs or flavor profiles. If you’re feeling adventurous, try using a different base mix entirely. An orange cake mix with orange zest and lemon pie filling creates a "St.
Clement’s" flavor that is incredibly sophisticated.
3 Ingredient "Light" Version
If you want to simplify even further, you can mix 1 box of Angel Food Cake Mix with the can of lemon pie filling. It creates a much fluffier, more sponge like bar that is lower in fat but still packed with that tart punch. Note that the texture will be more like a moist cake than a traditional bar.
gluten-free Swap
Most major brands now offer a gluten-free yellow or lemon cake mix. Because gluten-free flours are often thirstier, I recommend adding an extra tablespoon of melted butter to the crust to ensure it doesn't turn into a dry powder.
The pie filling is naturally gluten-free in most cases, but always double check the label for modified food starch sources.
| Servings | Pan Size | Cook Time | Yield |
|---|---|---|---|
| 8 People | 9x5 Loaf Pan | 35 mins | 8 thick bars |
| 16 People | 9x9 Square Pan | 25 mins | 16 standard bars |
| 32 People | 9x13 Sheet Pan | 22 mins | 32 thin party bars |
Smart Strategies for Storage and Freshness
Because of the dairy in the cream cheese and the moisture in the lemon filling, these bars shouldn't sit out on the counter for more than a couple of hours. I actually think they taste better on day two anyway; the flavors have time to marry, and the crust softens just a tiny bit into a melt in-your mouth texture.
Storage: Store your lemon bars in an airtight container in the fridge for up to 5 days. Place a piece of parchment paper between layers to prevent the powdered sugar from turning into a sticky glaze.
Freezing: These freeze remarkably well! Wrap individual squares tightly in plastic wrap and store them in a freezer bag for up to 3 months. To eat, just let them thaw in the fridge overnight. Don't add the powdered sugar until you are ready to serve, as it will dissolve in the freezer.
Zero Waste Tip: Don't toss that naked lemon after zesting and juicing! Slice the leftover peel into thin strips and simmer them in a bit of sugar water to make candied lemon peels for a garnish.
Or, toss the spent husks into a jar of white vinegar for a week to make a natural, citrus scented kitchen cleaner.
Elegant Ways to Garnish Your Dessert
Presentation is half the battle. You’ve put in the work (even if it was only 10 minutes of prep), so let's make it look like a million bucks. The classic dusting of powdered sugar is a must, but wait until the very last second to apply it.
If the bars are even slightly warm, the sugar will melt into the filling and disappear.
For a bit of "wow" factor, I love adding a tiny sprig of fresh mint or a single fresh raspberry on top of each square. The red against the bright yellow is stunning. If you want a more rustic look, you can skip the powdered sugar and drizzle a simple glaze made of leftover lemon juice and powdered sugar in a zigzag pattern across the whole pan.
- The Clean Cut: Use a long, sharp chef's knife. Dip it in hot water and wipe it dry between every single slice. This is the secret to those perfectly square, non smudged edges you see in bakeries.
- Citrus Curls: Use a vegetable peeler to take long strips of zest from a fresh lemon, then roll them into tight curls. Place one on the center of each bar for a professional finish.
- Texture Contrast: Sprinkle a few grains of flaky sea salt over the top. It might sound weird, but salt makes the lemon flavor explode and balances the sweetness of the cake mix perfectly. Trust me on this one.
Debunking Shortcut Baking Beliefs
One persistent myth is that you can't get a "real" shortbread texture from a cake mix. People think it will always be spongy. The truth is that by omitting the water and oil called for on the box and replacing them with a single egg and butter, you are changing the hydration levels.
This forces the mix to behave like a dough rather than a batter.
Another misconception is that canned pie filling is "too sweet" and lacks depth. While it is sweet on its own, our addition of fresh zest and juice reintroduces the volatile oils and citric acid that are often lost during the canning process.
It’s about balancing the pH levels to bring that "zing" back to the forefront.
Finally, some say you can't freeze lemon bars because the filling will separate. As long as you have the cream cheese in there as an emulsifier, the filling stays perfectly stable.
The fat in the cream cheese acts as a protective barrier for the water molecules, preventing those large ice crystals that cause separation. So go ahead and stock your freezer for those emergency dessert cravings!

Recipe FAQs
How do you make lemon bars with a cake mix?
Mix cake mix, melted butter, and one egg for the crust. Press this mixture firmly into a lined pan and blind bake for 10 minutes at 350°F. Then, whisk the lemon pie filling with softened cream cheese, fresh zest, and juice, pour it over the hot crust, and bake for another 15-20 minutes until set.
What are the two ingredient lemon bars?
No, these bars require a minimum of three main components for structure. A true two-ingredient bar often uses Angel Food Cake Mix combined with the lemon pie filling, which results in a much lighter, sponge like texture rather than a classic buttery shortbread base.
What makes Ina Garten's lemon bars special?
Ina Garten’s recipes typically rely on completely scratch ingredients, unlike this shortcut version. Her versions usually feature a homemade shortbread crust and a freshly made lemon curd filling, which results in a deeper flavor but requires significantly more active time.
Are lemon bars supposed to be refrigerated after baking?
Yes, refrigeration is essential for proper setting and slicing. After cooling on the counter for an hour, chill the bars in the refrigerator for at least one more hour before slicing; this helps the filling fully stabilize and prevents smearing when you cut them.
Can I substitute margarine for butter in the crust?
No, stick to unsalted butter for the best crust texture. Margarine contains more water than butter, which can inhibit the crust from becoming crisp and shortbread like, potentially leading to a greasy or soggy bottom layer.
How long do I bake the crust before adding the filling?
Bake the crust for exactly 10 minutes at 350°F. This crucial step, called blind baking, partially cooks the crust so it firms up and prevents the wet lemon filling from soaking into it, which is key for structural integrity. If you enjoyed mastering this layering technique, see how the same principle of pre-baking works to create a sturdy shell for our Bakery Style Fruit Tart.
What is the secret to getting clean, sharp slices?
Wipe your knife with hot water between every single cut. Dip a long, sharp chef’s knife into hot water, wipe it completely dry, then slice; this prevents the sticky filling from pulling away from the crust and keeps your edges immaculate.
Cake Mix Lemon Bars
Ingredients:
Instructions:
Nutrition Facts:
| Calories | 227 kcal |
|---|---|
| Protein | 1.7 g |
| Fat | 10.1 g |
| Carbs | 34.3 g |
| Fiber | 0.3 g |
| Sugar | 23.1 g |
| Sodium | 216 mg |
