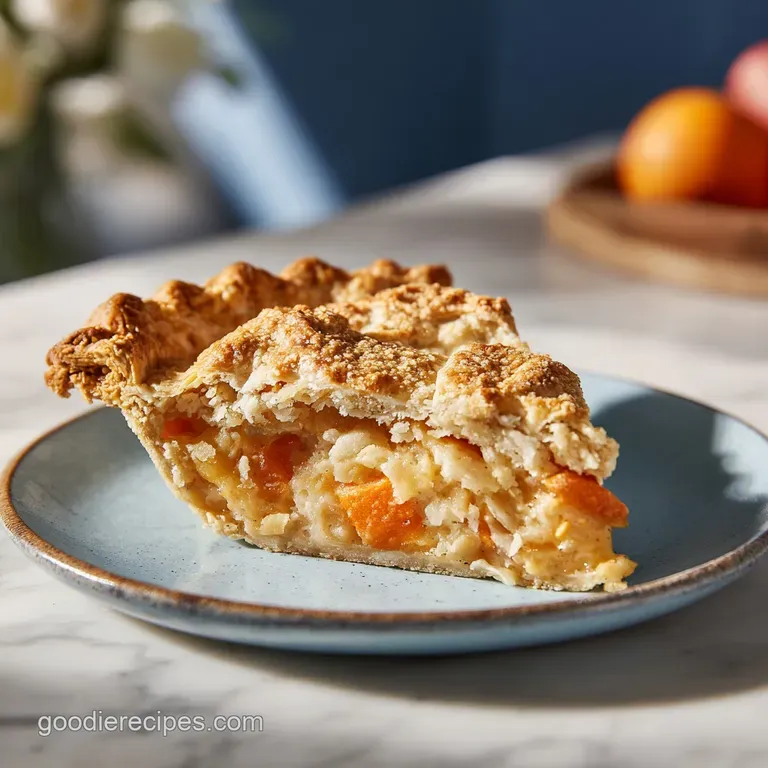
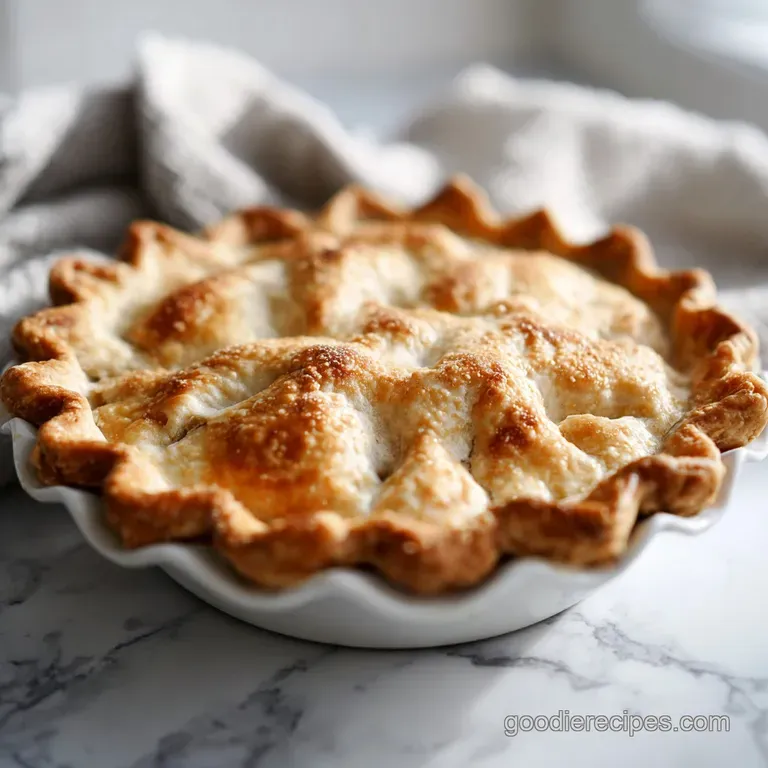
Easy Pie Crust: Flaky and Buttery
- Time: Active 15 minutes, Passive 60 minutes, Total 75 minutes
- Flavor/Texture Hook: Flaky, buttery, and incredibly tender
- Perfect for: Holiday baking, weekend treats, or beginner bakers
- Building the Most Reliable Easy Pie Crust Foundation
- Why This Buttery Flaky Pastry Always Wins Every Time
- Component Analysis for the Perfect Homemade Pastry Texture
- Everything Needed for This Simple Homemade Dough Recipe
- Minimal Tools Required for Professional Grade Pastry Results
- Easy Steps for Mixing and Rolling Your Dough Perfectly
- Fixing Common Mistakes for a Flawless Pastry Finish
- Simple Ways to Adapt This Recipe for Every Diet
- Storing and Freezing Your Homemade Pastry Discs Safely
- The Best Sweet and Savory Ways to Serve
- Myths About Pastry Making
- Recipe FAQs
- 📝 Recipe Card
Building the Most Reliable Easy Pie Crust Foundation
I still remember the first time I tried to make a crust from scratch in my tiny apartment kitchen. The sun was streaming through the window, and I had flour literally everywhere - in my hair, on the floor, even on the cat.
I was so worried about "doing it right" that I over handled the dough until it looked like gray cardboard. When it came out of the oven, it was so hard we actually needed a steak knife just to get through the bottom layer. It was a disaster, but it taught me the most important lesson in pastry: stop touching it.
The secret to an easy pie crust isn't fancy equipment or a secret French technique; it's all about how you treat the fat. When you see those little "pea sized" chunks of butter in your bowl, don't try to smooth them out! Those are your best friends.
Those little lumps are what will eventually turn into steam in the oven, lifting the flour into thousands of tiny, delicate layers that shatter when your fork hits them.
Nowadays, my kitchen is much more organized, but the philosophy remains the same. I want a dough that is forgiving, quick to pull together, and tastes like high-quality butter. This recipe uses basic pantry staples to create a base that works for everything from a deep dish apple pie to a savory quiche.
It’s the kind of reliable staple you’ll find yourself memorizing because the results are just that consistent.
Why This Buttery Flaky Pastry Always Wins Every Time
There is a bit of magic that happens when you mix fat and flour, and understanding why makes you a better baker instantly. We aren't just making a "dough," we are creating a suspension of fat within a flour matrix. If the fat melts before it hits the oven, you get a cookie like texture.
If it stays cold, you get layers.
- The Vinegar Advantage: Adding a tiny bit of apple cider vinegar helps to tenderize the dough by inhibiting excessive gluten development, ensuring the crust stays soft rather than chewy.
- Steam Power: Cold butter contains a small amount of water; when this hits the high heat of the oven, it evaporates instantly, pushing the layers of dough apart.
- Strategic Hydration: Using ice cold water prevents the butter from melting during the mixing process, which is the number one cause of "tough" crusts.
- Sugar for Browning: Even in savory dishes, a small amount of sugar helps the crust achieve a deep golden hue through the caramelization of the surface.
- Resting Period: Letting the dough chill for 60 minutes allows the gluten strands to relax, which prevents the crust from shrinking down the sides of your pan while baking.
| Method | Prep Time | Texture Result | Best For |
|---|---|---|---|
| By Hand (Pastry Cutter) | 15 minutes | Larger, rustic flakes | Fruit pies and galettes |
| Food Processor | 5 minutes | Even, sandy texture | Tart shells and quiche |
| Stand Mixer | 10 minutes | Very consistent crumb | Large batches or savory pies |
This dough creates a structure that is remarkably similar to the delicate layers found in my favorite homemade buttery rolls, where the fat is also the key to success. By mastering this balance of cold fat and minimal liquid, you ensure every bite has that sought after snap.
Component Analysis for the Perfect Homemade Pastry Texture
Choosing your ingredients wisely is half the battle when you're aiming for a professional result at home. While it's tempting to grab whatever is in the pantry, the quality of your flour and the temperature of your fat will dictate whether your crust is a triumph or a tragedy.
| Ingredient | Science Role | Pro Secret |
|---|---|---|
| Unsalted Butter | Provides fat for flakiness and moisture for steam | Freeze it for 10 minutes before cubing to keep it extra cold |
| All Purpose Flour | Provides the structural framework via gluten | Sift it first to ensure there are no clumps before adding fat |
| Sea Salt | Enhances flavor and strengthens gluten | Use fine grain so it dissolves evenly into the dough |
| Apple Cider Vinegar | Breaks down gluten bonds for tenderness | Keep it in the fridge alongside your water |
Each of these components plays a specific role in the thermodynamics of the bake. The flour provides the "skeleton," the butter provides the "insulation," and the liquid provides the "engine" (steam).
When they work in harmony, you get a crust that is both sturdy enough to hold a heavy filling and light enough to melt in your mouth.
Everything Needed for This Simple Homemade Dough Recipe
You won't need a trip to a specialty grocery store for this one. We are sticking to the classics because they work. Ensure everything is measured out before you start, as speed is your ally when trying to keep things cold.
- 320g All purpose flour: This provides the perfect protein balance for a tender but strong crust. Why this? Bread flour is too strong, and cake flour is too weak for this.
- 6g Fine sea salt: Crucial for balancing the richness of the butter. Why this? Fine salt dissolves faster than kosher salt in cold liquids.
- 12g Granated sugar: Adds a touch of sweetness and helps with browning. Why this? Even a small amount helps the Maillard reaction occur efficiently.
- 227g Unsalted butter: Must be very cold and cut into small cubes. Why this? Unsalted allows you to control the exact sodium level of your dough.
- 90ml Ice water: The colder, the better. Why this? Prevents the butter from softening during the mixing phase.
- 5ml Apple cider vinegar: Our "secret" tenderizing agent. Why this? It adds a subtle brightness and relaxes the gluten strands.
| Original Ingredient | Substitute | Why It Works |
|---|---|---|
| Unsalted Butter | Lard (same weight) | Higher melting point; creates the flakiest crust possible. |
| All Purpose Flour | Cup for-cup GF Flour | Use a blend with Xanthan gum. Note: May be more brittle. |
| Apple Cider Vinegar | Lemon Juice | Provides the same acidity. Note: Adds a faint citrus note. |
If you are looking for a completely different flavor profile for a specific dessert, this buttery base pairs beautifully with the same light, airy textures found in a pineapple sponge cake. The richness of the crust offsets the sweetness of the fruit perfectly.
Minimal Tools Required for Professional Grade Pastry Results
One of the mistakes I see often is people thinking they need a high end food processor to make an easy pie crust. While it can save time, some of my best crusts have been made with nothing more than a sturdy bowl and a couple of forks. Using fewer tools often means less cleanup and more control over the texture.
Chef's Tip: If your hands are naturally very warm, rinse them under ice cold water for a minute and dry them thoroughly before handling the dough. This small trick prevents you from melting the butter as you work.
The most essential tool you'll need is a large mixing bowl - preferably glass or metal, as they stay colder than plastic. A pastry cutter is great if you have one, but two forks used in a criss cross motion work just as well for "cutting in" the butter. You'll also need a rolling pin and some plastic wrap.
If you don't have a rolling pin, a smooth wine bottle (with the label removed and chilled in the fridge) is a fantastic rustic substitute that gets the job done.
Finally,, make sure you have a clean, flat surface for rolling. A marble slab is the gold standard because it stays cool, but a simple wooden cutting board or even a clean countertop works fine. Just remember to dust it lightly with flour; you want the dough to move freely, not stick and tear.
Easy Steps for Mixing and Rolling Your Dough Perfectly
Ready to get your hands a little floury? Follow these steps closely, and remember: speed and temperature are the keys to success. We want to work quickly so the butter stays solid until it reaches the oven.
- Whisk the dry base. In a large mixing bowl or food processor, whisk together the 320g flour, 6g salt, and 12g sugar until combined. Note: This ensures the salt and sugar are evenly distributed.
- Cut in the fat. Add the 227g of cold, cubed butter to the flour mixture. Use a pastry cutter or two forks to cut the butter into the flour until it resembles coarse crumbs with pea sized pieces of butter remaining.
- Prepare the liquid. Mix the 5ml apple cider vinegar into the 90ml ice water. Note: Using a liquid measuring cup makes this easier to drizzle.
- Incorporate the moisture. Drizzle half of the liquid over the flour and toss gently with a spatula. Continue adding water one tablespoon at a time until the dough just begins to clump into a shaggy mass.
- Test the hydration. Squeeze a handful of the shaggy dough; if it holds together without crumbling, stop adding water. Note: You might not need all 90ml of water depending on the humidity.
- Divide and shape. Turn the dough onto a clean surface and divide into two equal portions. Handle as little as possible to keep the butter cold.
- Wrap for chilling. Form each portion into a flat disc and wrap tightly in plastic wrap. Note: Flattening them now makes rolling much easier later.
- The long rest. Refrigerate the dough discs for at least 60 minutes. Wait until the dough is firm and the gluten has relaxed.
- Prepare for rolling. Remove one disc from the fridge and let it sit for 5 minutes if it feels too hard to roll.
- Roll it out. Dust your surface and roll from the center outward, rotating the dough 90 degrees after every few strokes until it is about 1/8 inch thick.
Fixing Common Mistakes for a Flawless Pastry Finish
Even with a simple recipe, things can occasionally go sideways. The most common issues usually stem from the dough being too warm or having too much water added. Don't panic if your dough doesn't look like a picture perfect magazine cover the first time; it will still taste incredible.
Why Your Dough is Crumbly and Falling Apart
If your dough is shattering as you try to roll it, it’s likely too dry. This often happens if the flour was packed too tightly in the measuring cup or if you were too timid with the water.
The fix is simple: sprinkle a teaspoon of ice water over the surface, fold the dough over itself once or twice, and let it rest again for 10 minutes. This gives the moisture a chance to redistribute without developing too much gluten.
If the Crust Shrinks During Baking
Shrinkage is almost always caused by "elastic" gluten. If you roll the dough and immediately put it in the oven, those gluten strands act like rubber bands and pull inward. Always make sure to rest the dough for the full 60 minutes after mixing, and another 15 minutes in the freezer once it's in the pie plate before you bake it.
This "sets" the shape so it stays put.
| Problem | Root Cause | Solution |
|---|---|---|
| Soggy Bottom | Filling leaked or oven was too cool | Blind bake the crust first or use a preheated baking sheet. |
| Tough Texture | Over handling the dough | Use a lighter touch and ensure butter stays cold. |
| Greasy Crust | Butter melted before baking | Chill the formed crust in the freezer for 15 mins before baking. |
Common Mistakes Checklist
- ✓ Don't skip the chilling step; it's vital for gluten relaxation.
- ✓ Ensure your water is truly ice cold (add actual ice cubes to the cup).
- ✓ Stop mixing the moment the dough clumps; "shaggy" is good.
- ✓ Use a light dusting of flour only; too much makes the crust dry.
- ✓ Rotate your dough frequently while rolling to prevent sticking.
Simple Ways to Adapt This Recipe for Every Diet
Cooking for a crowd often means navigating different dietary needs. Luckily, this easy pie crust is quite flexible. You can swap the fats and flours with a bit of care to ensure everyone gets a slice of the pie.
For a savory twist that pairs beautifully with pot pies or quiches, try adding a tablespoon of dried herbs like thyme or rosemary to the dry ingredients. It adds a wonderful aroma that hits you the second you open the oven door.
If you want a richer, more "shortbread" style crust, you can replace the water with cold heavy cream, though this will make the dough a bit more delicate to handle.
If you are scaling this recipe, keep these rules in mind. When doubling the batch (to make 4 discs), only use 1.5x the amount of salt and sugar to avoid an overwhelming seasoning. When cutting the recipe in half, it’s helpful to beat the water and vinegar together first and then measure out exactly 47ml to keep the ratios precise.
Chef's Tip: If you find yourself with extra dough scraps, don't throw them away! Brush them with melted butter, sprinkle with cinnamon sugar, and bake for 8-10 minutes. They make the best "chef's treat" while you wait for the main pie to finish.
Storing and Freezing Your Homemade Pastry Discs Safely
One of the best things about this recipe is how well it stores. I often make a double batch on a rainy Sunday so I have crusts ready to go whenever a craving strikes.
Refrigeration: You can keep the wrapped dough discs in the fridge for up to 3 days. After that, the oxidation might turn the dough a slightly gray color. It’s still safe to eat, but it won't look as appetizing.
Freezing: This dough freezes beautifully for up to 3 months. To prevent freezer burn, wrap the discs in plastic wrap and then place them inside a heavy duty freezer bag. When you're ready to use them, thaw them overnight in the refrigerator.
Do not try to thaw them on the counter, as the outside will get too warm while the inside remains frozen, leading to uneven rolling.
Zero Waste Tip: If you have leftover flour on your rolling surface, don't just wipe it into the bin. If it's clean, you can sift it and use it for roux or thickening gravies.
Also, save your butter wrappers in the freezer; they usually have just enough butter left on them to grease a pie plate perfectly!
The Best Sweet and Savory Ways to Serve
This crust is a blank canvas. While most people immediately think of apple or pumpkin pie, its versatility shouldn't be overlooked. Because we've kept the sugar relatively low (only 12g), it transitions seamlessly between dessert and dinner.
For a sweet application, try a classic berry galette. Since there’s no pie tin required, it’s the most stress free way to use this dough. Just roll it out, pile some fruit in the middle, and fold the edges over. The "shatter" of the buttery crust against the soft, jammy fruit is pure heaven.
On the savory side, this is my go to for a Sunday morning quiche. The high fat content in the crust creates a barrier that stands up well to custard fillings, provided you give it a quick blind bake first.
Whether you're filling it with chocolate ganache or roasted vegetables and goat cheese, this easy pie crust provides the perfect, flaky foundation for all your culinary adventures.
Myths About Pastry Making
There are so many "rules" floating around about pastry that it can feel intimidating. Let's clear up some of the most common misconceptions so you can bake with confidence.
Myth: You must use a food processor for a flaky crust. Truth: While a food processor is fast, it's actually easier to over mix the dough and melt the butter with the motor's heat. Mixing by hand with a pastry cutter or forks often results in larger butter chunks and a much flakier texture.
Myth: Adding more water makes the dough easier to work with. Truth: While more water makes the dough softer and easier to roll initially, it also leads to more gluten development and a significant amount of shrinkage in the oven.
The goal is to use the minimum amount of water possible to hold the dough together.
Myth: You should never use a glass pie plate. Truth: Glass is actually fantastic for beginners because it allows you to see the bottom of the crust. You can visually check if the bottom is golden brown and fully cooked, which helps prevent the dreaded soggy bottom.
Just be sure to place it on a preheated baking sheet for the best heat transfer.
Frequently Asked Questions
Can I use salted butter if that is all I have?
Yes, you can certainly use salted butter. If you do, simply omit the 6g of fine sea salt from the recipe to prevent the crust from becoming overly salty. The texture will remain exactly the same.
Why did my crust turn out tough instead of flaky?
Toughness is usually a result of over working the dough. When you knead or mix the dough too much, the gluten in the flour becomes strong and elastic. Aim for a "shaggy" appearance and stop mixing the moment the dough can be pressed into a ball.
Is it okay to skip the apple cider vinegar?
You can skip it, but the vinegar helps to break down the gluten, making the dough easier to roll and more tender after baking. If you don't have vinegar, an equal amount of lemon juice or even vodka can be used as a substitute.
How do I prevent the bottom of the pie from getting soggy?
The best way to avoid a soggy bottom is to "blind bake" the crust (bake it partially without filling) or to place the pie on a preheated heavy baking sheet or pizza stone. This ensures the bottom crust gets immediate, intense heat to set the structure before the filling soaks in.
Can I make this recipe vegan?
Yes! You can substitute the butter with a high-quality vegan butter stick (look for one with a high fat content) or vegetable shortening. Keep in mind that shortening won't have the same rich flavor as butter, but it will create a very flaky texture.
My dough is sticking to the rolling pin, what should I do?
If the dough starts sticking, it’s likely getting too warm. Dust the rolling pin and the top of the dough with a small amount of flour. If it continues to stick, slide the dough (on its parchment or plastic) onto a baking sheet and pop it in the fridge for 10 minutes to firm up the butter again.

Recipe FAQs
What are the ingredients in 3 ingredient pie crust?
This is a common misconception. A reliable, high-quality pie crust requires flour, salt, sugar, unsalted butter, ice water, and apple cider vinegar to achieve the correct structure and flake.
What is the trick to making good pie crust?
Keep everything ice-cold until the dough enters the oven. The secret is ensuring the butter remains in small, solid, pea-sized pieces throughout the mixing and rolling process to create steam filled layers during baking. If you mastered this technique, you can use similar temperature control logic to achieve perfect results in our Soft Dinner Rolls Recipe.
Is pie crust better with butter or crisco?
Butter is superior for flavor and texture. While vegetable shortening provides stability, cold unsalted butter creates a richer taste and distinct, flaky layers that vegetable based fats cannot replicate.
What can I use if I don't have a pie crust?
Use a pressed-in crumb base or phyllo dough. If you lack the time for traditional pastry, crushed cookies or crackers mixed with melted butter can serve as a functional substitute for many fillings.
How to keep the dough from shrinking in the pan?
Refrigerate the formed discs for at least one hour before rolling. This rest allows the gluten network to relax, which prevents the crust from pulling away from the edges while it bakes.
How to tell if the dough is hydrated enough?
Check that the dough is just beginning to clump into a shaggy mass. Drizzle your ice water mixture slowly and toss with a fork; avoid adding excess liquid, as this makes the crust tough rather than tender.
How to store leftover pie dough?
Wrap the discs tightly in plastic wrap to prevent oxidation. You can store them in the refrigerator for up to 3 days or in the freezer for up to 3 months to prevent freezer burn.
Easy Homemade Pie Crust
Ingredients:
Instructions:
Nutrition Facts:
| Calories | 177 kcal |
|---|---|
| Protein | 2 g |
| Fat | 11.5 g |
| Carbs | 16 g |
| Fiber | 0.5 g |
| Sugar | 0.8 g |
| Sodium | 145 mg |
