Ground Beef Recipe with Garlic and Herbs: Flavor-Well Method
- Time: Active 5 minutes, Passive 10 minutes, Total 15 minutes
- Flavor/Texture Hook: Savory, crusty exterior with a buttery garlic finish
- Perfect for: Busy weeknight dinners or budget conscious meal prepping
A Simple Ground Beef Recipe with Garlic and Herbs
Forget the myth that ground beef is just a "budget filler" or something that only belongs in a taco shell. Most people treat this protein with zero respect, tossing it into a lukewarm pan and moving it around until it turns that unappealing, steamed gray color.
I used to do the same thing until I realized that ground beef is actually a blank canvas that can hold more flavor than a prime rib if you treat it right. The secret isn't in expensive spices, but in how you manage the heat and the timing of your aromatics.
Here's your ultimate Ground Beef Recipe with Garlic and Herbs, a single sensational dish you'll want to make again and again. This recipe is all about the "hard sear" and the "herb fold," two techniques that take about ten minutes but make the meat taste like it came from a bistro.
When that fat starts to render and the garlic hits the hot oil in the center of the pan, the aroma is enough to bring everyone into the kitchen. It is pure comfort, simple as that.
We are going for big flavors here without breaking the bank. By using an 85/15 fat ratio, we get enough moisture to keep things juicy without the meat swimming in a pool of grease. This dish is the backbone of my family's weekly rotation because it is fast, versatile, and uses ingredients we always have in the pantry.
You're going to love how the fresh herbs "bloom" in the residual heat, keeping their bright color and punchy flavor.
The One Thing That Changes Everything
You might be tempted to just dump the meat in and stir, but let's talk about the "Patty Method" for a second. This is the one step most people skip, and it is the reason their beef lacks that deep, savory punch.
By pressing the meat into one large flat shape, you minimize the surface area exposed to air and maximize the contact with the hot metal. This creates a uniform crust that develops those complex savory notes we all crave.
The Flavor Well: Pushing the meat to the edges creates a concentrated pool of hot fat in the center. This is where we "bloom" the garlic, allowing the heat to pull the essential oils out of the garlic without burning it against the pan's surface.
Residual Infusion: Fresh herbs like parsley and thyme are delicate, so we never cook them. Instead, we fold them in after the heat is off, letting the warmth of the beef gently wilt them so they taste fresh, not muddy or bitter.
| Thickness | Internal Temp | Rest Time | Visual Cue |
|---|---|---|---|
| 0.5 inch | 160°F | 2 minutes | Deep brown crust on bottom |
| 1.0 inch | 160°F | 3 minutes | No pink liquid in the center |
| 0.25 inch | 165°F | 1 minute | Shatter crisp edges |
Using a cast iron skillet like a Lodge is my favorite way to do this because it holds heat so well. If you are looking for more ways to use this versatile protein, you might want to try this Simple Ground Beef Taco for your next family night. It uses similar over high heat techniques but with a different spice profile.
Recipe Specs
When we talk about ground beef recipes, precision matters more than you think. If the pan isn't hot enough, the meat releases its juices too early and you end up "boiling" the beef in its own liquid. That is the enemy of flavor. We want the "hiss" the moment that beef hits the iron.
For this recipe, we are looking for a 15 minute total investment. That includes the five minutes you spend mincing those six cloves of garlic. Don't be shy with the garlic; it mellows out significantly as it hits the oil. We also need to be mindful of the weight and the fat content.
One pound of 85/15 beef is the "sweet spot" for a standard 10 or 12 inch skillet. Any more than that and you'll crowd the pan, which leads to steaming rather than searing.
| Component | Science Role | Pro Secret |
|---|---|---|
| 85/15 Ground Beef | Fat to lean balance | Press into a patty for a 4 minute undisturbed sear |
| Minced Garlic | Aromatic base | Add to the "flavor well" only at the very end |
| Fresh Thyme | Essential oil release | Strip the leaves by pulling against the stem growth |
The 10 minute cook time is non negotiable if you want that juicy interior. We spend four minutes on the first side to get that crust, and the remaining six minutes breaking it down and finishing the aromatics. It’s a fast paced process, so have your herbs chopped and ready before the stove even goes on.
Ingredient Deep Dive
The magic of this ground beef skillet recipe lies in its simplicity. Since we only have a few ingredients, each one has to pull its weight. I always opt for fresh herbs here because dried ones can feel "woody" in a quick cook dish like this.
If you are on a budget, buy the bunch of parsley and freeze the stems for a later stock.
- 1 lb ground beef (85/15 ratio): This is the best balance of flavor and value. The fat carries the garlic flavor throughout the dish. Why this? Higher fat ratios drain away, while lower ratios (90/10) often turn out dry and crumbly.
- 6 cloves garlic, minced: We want a lot of garlic here. Why this? Mincing creates more surface area, releasing more of that pungent "allicin" for a bolder flavor.
- Fresh parsley and thyme: These provide the "herbs" in our title. Why this? Parsley adds freshness while thyme adds an earthy, floral note that cuts through the beef's richness.
- Extra virgin olive oil: Just a tablespoon to help the garlic bloom. Why this? It has a lower smoke point than vegetable oil but adds a peppery finish to the meat.
If you have leftovers or want to stretch this meal, it works beautifully in a Hearty Beef Barley Soup the next day. The garlic and herb profile carries over perfectly into a broth based soup.
Equipment Needed
You don't need a professional kitchen, but two specific tools will make your life much easier. First, a heavy bottomed skillet is essential. Cast iron is the gold standard because it radiates heat evenly, ensuring that the edges of your beef patty get just as brown as the center.
If you don't have cast iron, a heavy stainless steel pan works, but avoid thin non stick pans as they can't handle the high heat required for a proper sear.
Second, get a stiff metal spatula. You need something with a sharp, flat edge to get under that crust and flip the meat without leaving the best bits stuck to the pan. Those little brown bits (called "fond") are concentrated flavor, and you want them on the meat, not in the dishwasher.
A flexible plastic spatula just won't have the leverage to break the beef into those perfect, bite sized crumbles we're looking for.
How to Make It

- Preheat your skillet. Set your cast iron or stainless steel pan over medium high heat. Wait until a drop of water flicked onto the surface evaporates instantly with a loud hiss.
- Form the beef patty. Take your 1 lb of ground beef and gently press it into a large, flat circle about 1 inch thick. Do not overwork the meat or it will become tough.
- Sear the first side. Place the beef patty in the hot skillet. Press down firmly with your metal spatula to ensure total contact.
- The undisturbed wait. Let the beef cook for exactly 4 minutes. Resist the urge to move it, peek under it, or poke it. You want a dark, mahogany crust to form.
- Flip and crumble. Use your stiff spatula to flip the beef in large sections. Now, start breaking it into smaller crumbles.
- Evaporate the moisture. Continue cooking for about 3-4 minutes. If you see liquid pooling, turn the heat up slightly until it evaporates and the meat starts to sizzle again.
- Create the flavor well. Push the beef to the edges of the pan, leaving an empty circle in the middle.
- Bloom the aromatics. Add the olive oil and minced garlic to the center. Cook for 30-60 seconds until you smell a rich, nutty aroma.
- The final toss. Mix the beef back into the center, coating it in that garlic oil. Remove the pan from the heat immediately.
- The herb finish. Fold in your chopped parsley and minced thyme. Let it sit for 1 minute so the residual heat can release the oils from the herbs.
How to Fix Common Problems
Sometimes things go sideways in the kitchen, but ground beef is very forgiving. The most common issue I hear about is the meat looking gray and "soupy" instead of brown and crispy. This usually happens because the pan wasn't hot enough or there was too much moisture in the meat. If this happens, don't panic.
Just keep the heat high and wait for that water to disappear. Once the liquid is gone, the "real" frying begins.
Why Your Beef is Sitting in Liquid
If your beef looks like it’s boiling, it means the temperature of the pan dropped too low. This happens if the meat was straight from the fridge or if you crowded a small pan. The solution is simple: increase the heat and stop stirring.
Let that liquid cook off, and once you hear a sharp "crackle" instead of a "bubble," you know you're back on track for a good sear.
| Problem | Root Cause | Solution |
|---|---|---|
| Bitter Flavor | Garlic burned in the pan | Add garlic only after heat is lowered and for <60 seconds |
| Tough Texture | Overworked the raw meat | Press the patty gently; do not "knead" the beef |
| Greasy Finish | Didn't drain excess fat | Use 85/15 ratio or pat the cooked crumbles with a paper towel |
Common Mistakes Checklist - ✓ Pat the beef dry with a paper towel before forming the patty (removes surface moisture). - ✓ Never use a cold pan; the "hiss" is your indicator of success. - ✓ Avoid "over stirring" which prevents the Maillard reaction from occurring.
- ✓ Use fresh garlic, never the jarred stuff, for this specific quick sear method. - ✓ Add herbs only after the heat is off to prevent them from turning bitter.
Mix It Up
One of the reasons I love this simple ground beef recipe with garlic and herbs is how easy it is to pivot based on what's in the pantry. If you're craving something more Mediterranean, swap the parsley for fresh oregano and add a squeeze of lemon juice at the very end.
The acidity of the lemon cuts through the beef's fat and makes the garlic pop in a whole new way.
For a creamier, more "comfort food" vibe, you can toss the finished beef with a splash of heavy cream or a dollop of sour cream right before serving. It creates a silky sauce that coats the garlic and herbs. I usually serve this over a big bowl of buttered egg noodles. If you want a more substantial meal, this beef is the perfect base for classic stuffed peppers. Just mix the cooked beef with some rice and bake it inside the peppers.
| Feature | Fresh Herbs | Dried Herbs |
|---|---|---|
| Flavor Profile | Bright, grassy, floral | Concentrated, earthy, woody |
| Timing | Added at the very end | Added during the browning phase |
| Texture | Soft and tender | Can be slightly gritty if not rehydrated |
Scaling
If you're cooking for a crowd, you'll need to be careful about pan space. For 2 lbs of beef, do not try to squeeze it all into one skillet. You will end up with gray, steamed meat every time. Instead, work in two separate batches or use two skillets simultaneously.
When scaling up, you only need to increase the salt and spices by about 1.5 times rather than doubling them, as the flavors become more concentrated in larger volumes.
To scale down for a solo dinner, use a small 8 inch skillet and reduce the cook time by about 2 minutes. Since a smaller amount of meat has more surface area relative to its weight, it will brown much faster.
You can also beat one egg, use half for a different recipe, and use the other half to bind a smaller portion of beef if you want to make mini sliders with the same garlic herb profile.
Preservation Secrets
Ground beef with garlic and herbs keeps remarkably well, making it a star for meal prep. Store it in an airtight container in the fridge for up to 4 days. When reheating, I recommend using a skillet over medium heat with a tiny splash of water or beef broth.
This "steams" the meat slightly, preventing it from getting that rubbery texture that happens in the microwave.
If you want to freeze it, this beef stays good for up to 3 months. Let it cool completely before putting it in a freezer bag, and squeeze out as much air as possible to prevent freezer burn. For a zero waste tip: don't throw away the fat that renders out!
You can save it in a small jar in the fridge and use it to sauté potatoes the next day. Those potatoes will carry the subtle ghost of the garlic and herbs, and they will be the best home fries you've ever had.
Presentation Tips
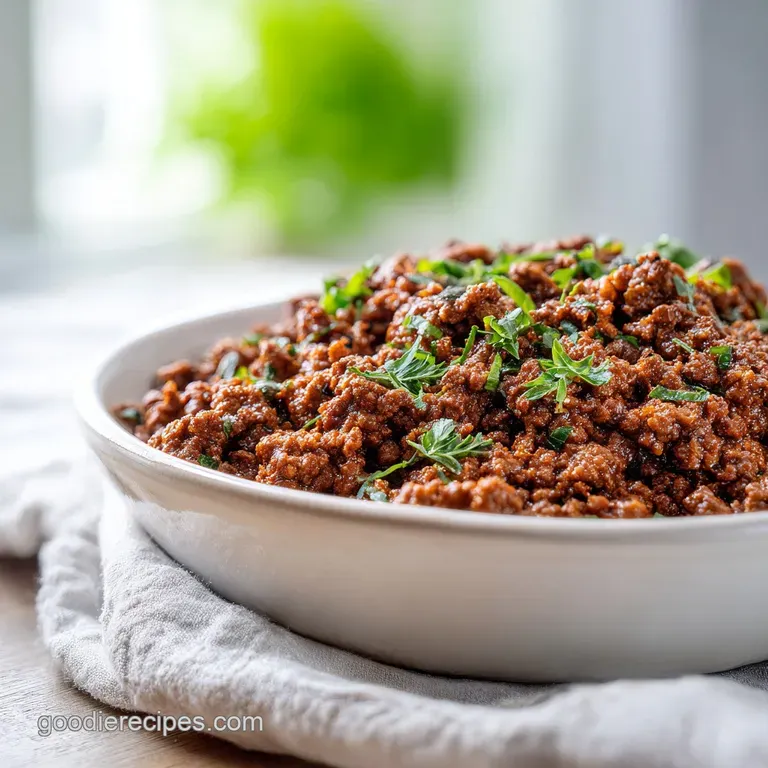
Even a simple skillet meal deserves to look good. I like to serve this in the cast iron pan it was cooked in it feels rustic and keeps the meat hot for a long time. Top it with an extra sprinkle of fresh parsley and a few cracks of black pepper right before it hits the table.
The green of the herbs against the deep brown of the seared beef is a classic look that never fails.
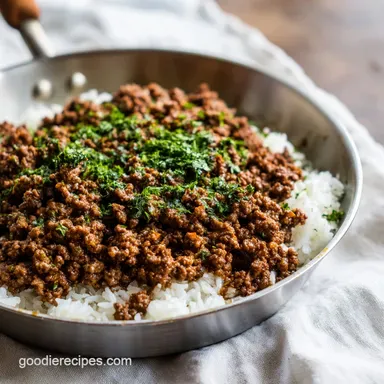
If you're serving this over rice, use a small bowl to mold the rice into a dome shape on the plate, then spoon the garlic beef around the base. It looks like something you'd get at a nice bistro.
You can also add a few lemon wedges on the side; the bright yellow adds a pop of color and gives guests the option to add that hit of acid that makes the herbs sing. Right then, let's get that skillet hot and start cooking!

Recipe FAQs
Is garlic and herb seasoning good for ground beef?
Yes, it is the classic pairing for beef. Fresh parsley, thyme, and rosemary cut through the richness of the 85/15 fat ratio, elevating the flavor profile far beyond basic salt and pepper.
What is the secret to flavorful ground beef?
The secret is the hard sear. By pressing the meat into a single patty and leaving it undisturbed for 4 minutes, you develop a deep, caramelized crust via the Maillard reaction. If you enjoyed mastering the Maillard reaction here, you can apply that same high heat searing principle to lock in savory depth in other proteins.
What seasoning can I put in ground beef to make it taste better?
Stick to fine sea salt and coarse black pepper. These basics are all you need when you rely on the aromatic lift of fresh minced garlic and herbs to provide the final flavor punch.
When to add garlic to ground beef?
Add it only after the meat is 90% cooked. Push the beef to the edges of the skillet to create a center "flavor well," add the olive oil and garlic, and let it bloom for 30-60 seconds to prevent the garlic from burning or turning bitter.
Is it true I must stir the beef constantly while cooking?
No, this is a common misconception. Stirring too early encourages the meat to steam in its own juices, resulting in a gray color and rubbery texture rather than the dark, crusty browning you want.
How to ensure the beef browns instead of steaming?
Increase your heat if liquid starts to pool. If the meat releases too much moisture, turn the burner up to ensure that liquid evaporates quickly, allowing the beef to fry in its own rendered fat.
How to finish the dish with fresh herbs?
Remove the pan from the heat first. Folding in the parsley and thyme immediately after turning off the burner uses the residual heat to gently wilt the herbs, preserving their bright, aromatic essential oils.
Garlic Herb Ground Beef
Ingredients:
Instructions:
Nutrition Facts:
| Calories | 243 kcal |
|---|---|
| Protein | 21 g |
| Fat | 16 g |
| Carbs | 2 g |
| Fiber | 0.4 g |
| Sugar | 0.1 g |
| Sodium | 582 mg |
