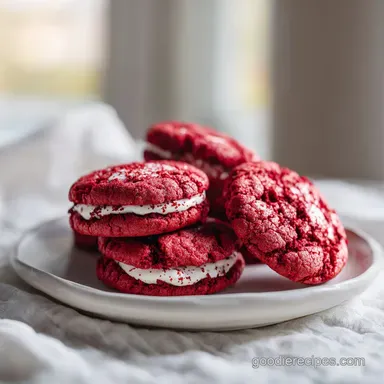
Red Velvet Cupcake Cookies: Soft and Tangy

- Time:15 minutes active + 30 minutes chilling + 10 minutes baking = 55 minutes total
- Flavor/Texture Hook: A velvety, soft baked center with a slight cocoa earthiness and a lush, tangy cream cheese finish
- Perfect for: Holiday gift boxes, birthday party favors, or a rainy day kitchen project
- The Secret to Perfect Red Velvet Cupcake Cookies
- What Actually Makes Them Chewy
- Serving Size and Batch Calculator
- Component Analysis and Selection
- Gathering Your Essentials and Substitutes
- Professional Tools for Bakery Results
- The Step-by-Step Cooking Process
- How to Fix Common Baking Problems
- Adjusting the Recipe Volume
- Comparing Scratch vs Shortcut Methods
- Debunking Red Velvet Misconceptions
- Storage Guidelines and Zero Waste Tips
- Creative Serving Ideas
- Recipe FAQs
- 📝 Recipe Card
The Secret to Perfect Red Velvet Cupcake Cookies
Imagine the smell of butter and sugar hitting a hot oven, but then a wave of rich vanilla and a whisper of cocoa catches you. That’s the first thing you notice when you slide a tray of these into the kitchen.
I remember the first time I tried to turn my favorite cake into a cookie; it was a total disaster because I didn't account for the moisture. The cookies just turned into thin, greasy puddles on the pan.
It was honestly heartbreaking to waste all that good cocoa, but it taught me one massive lesson: red velvet needs a bit of structural help to stay thick and pillowy.
The "quick win" here is that you get the exact vibe of a gourmet cupcake without having to deal with liners, muffin tins, or the delicate crumb of a sponge. We’re aiming for something you can sink your teeth into a cookie that has a distinct "shatter" on the very outer edge while the middle stays as soft as a cloud.
By using a specific ratio of granulated to brown sugar, we ensure the cookie doesn't just taste like sugar; it has that deep, almost caramelized undertone that makes the red gel color pop.
We’ve all seen those vibrant red treats that look great but taste like nothing. That’s usually because the baker was afraid to use enough cocoa or forgot the acid. In this recipe, we’re using a splash of white vinegar. It sounds weird for a cookie, right?
But it’s the secret to that classic "tang" that defines red velvet. Without it, you just have a red chocolate chip cookie. Trust me, once you pull these out and swirl that cream cheese frosting on top, you’ll never go back to the boxed stuff.
What Actually Makes Them Chewy
Getting that signature texture isn't just luck; it's about how the ingredients interact under heat. Here is why this specific formula works so well:
- Acid Activation: The white vinegar reacts with the baking soda to create tiny carbon dioxide bubbles, giving the cookie a lift that mimics the airy crumb of a cupcake.
- Starch Softening: Cornstarch interferes with the gluten formation from the flour, ensuring the cookie remains tender and "velvety" rather than tough or bread like.
- Moisture Retention: Brown sugar contains molasses, which is hygroscopic (it pulls moisture from the air), keeping the cookies soft for days instead of turning them into rocks.
- Gel Concentration: Using gel instead of liquid food coloring allows for a deep, saturated red without thinning out the dough, which would cause the cookies to spread too thin.
Serving Size and Batch Calculator
Knowing exactly how much you're making is crucial, especially if you're planning a party or a small gathering. Use this guide to adjust your kitchen prep before you start creaming your butter.
| Servings | Ingredient Adjustments | Pan Size | Total Bake Time |
|---|---|---|---|
| 6 people | Halve all ingredients (use 1/2 egg) | 1 large baking sheet | 10 minutes |
| 12 people | Use original Schema quantities | 2 large baking sheets | 10 minutes |
| 24 people | Double ingredients (keep spices 1.5x) | 4 baking sheets | 20 minutes (batches) |
Whether you are baking for a small family treat or a full office party, the key is keeping the dough balls consistent at roughly 3 tablespoons (about 60g) each. This ensures that every person gets that perfect ratio of soft center to crispy edge.
Component Analysis and Selection
Choosing the right version of your staples makes a world of difference in the final aroma and bite. Here’s why we selected these specific elements for the dough.
| Ingredient | Science Role | Pro Secret |
|---|---|---|
| Dutch Processed Cocoa | Low acidity/Deep color | Sift it twice to avoid those tiny, bitter "cocoa pebbles" in your dough. |
| Cream Cheese (Brick) | Fat and stability | Never use the "tub" spread; it’s too aerated and will make your frosting runny. |
| Cornstarch | Protein buffer | This is the "secret sauce" for that bakery style loft and a melt in-the mouth feel. |
| White Vinegar | Color preservation | It brightens the red hue and provides the essential acidic "zing" of red velvet. |
If you find yourself running low on Dutch processed cocoa, you can technically use natural cocoa powder, but the cookies will be a bit lighter in color and slightly more acidic. For another decadent treat, you might enjoy trying a Cookies and Cream Cheese Ball which uses similar creamy elements but in a no bake format.
Gathering Your Essentials and Substitutes
Before you turn on the mixer, make sure everything is at the right temperature. Cold eggs or butter will cause the dough to "break" or curdle, which ruins the aeration we worked so hard for.
- 115g Unsalted Butter (1/2 cup): Softened. Why this? Provides the fat base for a tender, buttery crumb.
- Sub: Salted butter (just omit the 1/4 tsp salt later).
- 150g Granulated Sugar (3/4 cup):Why this? Helps the edges crisp up beautifully.
- Sub: Extra brown sugar for a fudgier, darker cookie.
- 50g Light Brown Sugar (1/4 cup):Why this? Adds moisture and a hint of molasses flavor.
- Sub: Dark brown sugar for a deeper, more robust profile.
- 1 Large Egg: Room temperature. Why this? Binds the dough together without making it heavy.
- Sub: 1/4 cup applesauce (yields a denser, flatter cookie).
- 15ml Vanilla Extract (1 tbsp):Why this? Rounds out the cocoa and sugar flavors.
- Sub: Vanilla bean paste for those beautiful black specks.
- 2.5ml White Vinegar (1/2 tsp):Why this? Reacts with soda for lift and tang.
- Sub: Lemon juice or apple cider vinegar.
- 1 tbsp Red Gel Food Coloring:Why this? Provides the iconic hue without changing dough consistency.
- Sub: 2 tbsp liquid red color (reduce vanilla by 1 tsp).
- 250g All Purpose Flour (2 cups):Why this? The structural backbone of the cookie.
- Sub: 1:1 gluten-free baking flour.
- 25g Dutch Processed Cocoa (3 tbsp):Why this? Gives the "chocolate lite" flavor of true red velvet.
- Sub: Black cocoa for a darker, "oreo style" look.
- 1 tsp Cornstarch:Why this? Keeps the cookies soft and prevents over spreading.
- Sub: Arrowroot powder.
- 1/2 tsp Baking Soda:Why this? The leavening agent that reacts with the vinegar.
- Sub: 1.5 tsp baking powder (omit vinegar if using this).
- 1/4 tsp Salt:Why this? Enhances the chocolate and sugar notes.
For the frosting, you'll need 115g (4 oz) of brick style cream cheese, 55g (1/4 cup) unsalted butter, 240g (2 cups) powdered sugar, 5ml (1 tsp) vanilla, and a splash (5ml / 1 tsp) of heavy cream.
If you're out of heavy cream, a bit of whole milk works just fine to smooth things out.
Professional Tools for Bakery Results
You don't need a professional kitchen, but a few specific items make this much easier. A stand mixer (such as a KitchenAid) is the best way to get enough air into the butter and sugar, but a sturdy hand mixer works too.
I highly recommend using a spring loaded cookie scoop; it ensures all 12 cookies are exactly the same size, which means they all finish baking at the same time.
You’ll also want parchment paper or a silicone baking mat. Red velvet dough is notorious for sticking to bare metal, and you don't want to lose those crispy bottoms to the pan.
For the frosting, a piping bag with a large round tip (like a Wilton 1A) will give you that iconic cupcake swirl. If you don't have one, a Ziploc bag with the corner snipped off works in a pinch, though the swirl might be a little less "crisp" in its definition.
The step-by-step Cooking Process

Follow these steps closely, especially the chilling part. It’s the difference between a thick cookie and a flat one.
- Cream the fats. In your large bowl, beat the 1/2 cup butter with both sugars for exactly 3 minutes. Note: You are looking for the mixture to turn pale and look like whipped frosting.
- Add liquids. Mix in the egg, 1 tbsp vanilla, and 1/2 tsp white vinegar. Wait for the emulsification—the mixture should look smooth, not curdled.
- Incorporate color. Stream in the 1 tbsp red gel food coloring. Mix until the color is a deep, uniform ruby with no yellow streaks.
- Whisk dry base. In a separate bowl, whisk the 2 cups flour, cocoa, cornstarch, soda, and salt. Note: Whisking prevents "soda pockets" that taste metallic.
- Combine gently. Gradually add dry ingredients to wet on the lowest speed. Stop the moment the white flour streaks vanish.
- Shape and chill. Scoop the dough into 12 large balls (3 tbsp each). Place on a plate and chill in the fridge for 30 minutes. Note: Chilling solidifies the butter so they don't melt too fast in the oven.
- Preheat and prep. Set your oven to 175°C (350°F) and line your sheets. Space the chilled balls at least 3 inches apart.
- The targeted bake. Bake for exactly 10 minutes. The edges should look set and matte, but the centers will still look a bit soft.
- Cooling phase. Let them sit on the hot pan for 5 minutes before moving to a wire rack. They "carryover cook" during this time.
- Frost and finish. Beat the 4 oz cream cheese and 1/4 cup butter until smooth, then add powdered sugar, vanilla, and cream. Pipe a thick swirl onto each completely cooled cookie.
How to Fix Common Baking Problems
Sometimes things go sideways in the kitchen. If your cookies don't look like the pictures, it's usually a small environmental or temperature tweak that's needed.
Why Your Cookies Spread Too Much
If your cookies turned into one giant sheet on the pan, your butter was likely too warm before it went into the oven. If the kitchen is hot, that 30 minute chill might need to be 45 minutes. Also, make sure you aren't placing dough balls onto a baking sheet that is still hot from a previous batch.
Why the Cookies Are Too Dry
If your cookies are crumbly or tough, they probably stayed in the oven for even 2 minutes too long. These cookies should look slightly underdone when you pull them out. They firm up as they cool.
Another culprit could be "packing" your flour into the measuring cup; always spoon it in and level it off to avoid adding too much starch.
If the Frosting is Too Soft to Pipe
This usually happens if the cream cheese or butter was too soft (almost melting) or if you used the tub style cream cheese. To fix this, simply pop the frosting bowl in the fridge for 15 minutes to firm up the fats, then give it a quick whip before loading the piping bag.
| Problem | Root Cause | Solution |
|---|---|---|
| Dull Red Color | Using liquid tint | Use "Gel" or "Paste" coloring for intensity without thinning dough. |
| Grainy Frosting | Un sifted sugar | Sift powdered sugar through a fine mesh strainer before beating. |
| Hard Bottoms | Dark baking pans | Lower oven temp by 10°C or use a light colored aluminum sheet. |
Common Mistakes Checklist
- ✓ Never skip the 30 minute chill; it’s the secret to the cookie’s loft.
- ✓ Use room temperature eggs to ensure the emulsion doesn't break.
- ✓ Don't over mix once the flour goes in; over mixing develops gluten and makes cookies tough.
- ✓ Ensure cookies are 100% cold before frosting, or the cream cheese will melt into a glaze.
- ✓ Use brick cream cheese (like Philadelphia) for a pipeable, sturdy frosting.
Adjusting the Recipe Volume
If you need to scale this recipe up or down, the chemistry remains mostly the same, but watch your spice ratios.
- To Halve the Recipe: Use 1/2 of an egg by whisking a whole egg in a cup and measuring out 2 tablespoons. Use the same 10 minute bake time, but check them at 8 minutes.
- To Double the Recipe: Do not double the salt or baking soda fully; use 1.5x the amount instead (3/4 tsp soda and 3/8 tsp salt) to avoid a chemical aftertaste. Work in batches so the dough doesn't sit out and get warm while the first tray bakes.
- Baking Large Batches: If you are doubling the recipe and using two oven racks at once, rotate the pans halfway through the 10 minute bake to ensure even browning.
If you enjoy scaling recipes for crowds, you might find my Red Velvet Waffles recipe helpful, as it's designed specifically for a 5 serving yield and is easily doubled for brunch parties.
Comparing Scratch vs Shortcut Methods
You might be tempted to just grab a box of cake mix, and while that's fast, there are trade offs in the final sensory experience.
| Method | Texture | Flavor Complexity | Effort Level |
|---|---|---|---|
| From Scratch | Chewy, dense, and "velvety" | Balanced cocoa/tang | Moderate (55 mins) |
| Cake Mix Hack | Light, airy, and "cakey" | Artificial vanilla notes | Low (20 mins) |
| Frozen Dough | Slightly drier | Muted cocoa | Zero (Bake only) |
The scratch method wins every time because of the control you have over the cocoa quality and the salt balance. Plus, that hint of vinegar you add yourself is something a box mix just can't replicate.
Debunking Red Velvet Misconceptions
One of the biggest myths is that red velvet is just chocolate cake with red dye. Historically, the red color came from a reaction between non alkalized (natural) cocoa and acid. However, modern cocoa is usually "Dutched" (alkalized), which neutralizes that reaction, making the food coloring a necessity today for that vibrant look.
Another myth is that you must use beet juice for "authentic" red velvet. While you can use beets, they often leave an earthy, vegetal aftertaste that clashes with the cream cheese. Gel coloring is the gold standard for getting that neon bright interior without affecting the flavor profile.
Finally, some think you need a lot of cocoa. Red velvet is actually meant to be a "mild" chocolate flavor; it’s more of a vanilla cocoa hybrid, which is why we only use 3 tablespoons.
Storage Guidelines and Zero Waste Tips
These cookies are high in moisture and contain dairy, so you need to be smart about how you keep them.
Storage: Because of the cream cheese frosting, these must be stored in the refrigerator in a single layer. They will stay fresh and lush for up to 4 days. If you haven't frosted them yet, the "naked" cookies can stay in an airtight container at room temperature for 3 days.
Freezing: You can freeze the unfrosted cookies for up to 2 months. Wrap them individually in plastic wrap and then place them in a freezer bag. To serve, thaw at room temperature and apply fresh frosting.
I don't recommend freezing them with the frosting on, as cream cheese can sometimes change texture (becoming grainy) once thawed.
Zero Waste: If you have leftover cream cheese frosting, don't toss it! It makes an incredible dip for apple slices or a filling for graham cracker sandwiches. If you have a few cookies that broke during baking, crumble them up and use them as a topping for vanilla ice cream or a yogurt parfait.
Even the "cocoa flour dust" left in the bowl can be whisked into your next batch of pancake batter for a chocolatey morning boost.
Creative Serving Ideas
While these are a showstopper on their own, you can take the presentation further. Try rolling the edges of the frosted cookies in crushed pecans or mini chocolate chips for an added "crunch" factor.
For a holiday vibe, a light dusting of cocoa powder or a single pomegranate seed on top of the cream cheese swirl looks incredibly professional.
If you're serving these at a party, arrange them on a white marble slab to make that red color really pop. They pair exceptionally well with a cold glass of milk or a sharp, bitter espresso that cuts through the richness of the frosting. If you’re looking for a larger format cake version of this same flavor profile, my Red Velvet Cake recipe uses very similar science to achieve those silky, baked layers you love. Enjoy the process and don't forget to lick the frosting beaters!

Recipe FAQs
Is it required to chill the dough for 30 minutes?
Yes, this step is essential. Chilling the dough balls in the refrigerator for 30 minutes prevents the cookies from over spreading during the 10-minute bake time.
How to avoid tough, dry cookies?
Stop mixing immediately once no white streaks remain. Over mixing the flour and cocoa powder develops excess gluten, which leads to a tough texture rather than the intended soft, red velvet crumb.
Is it true I can frost these while they are still warm?
No, this is a common misconception. You must wait until the cookies are completely cold, or the cream cheese frosting will melt into a runny glaze instead of holding its shape.
Can I use whipped cream cheese for the frosting?
No, stick to brick style cream cheese. Whipped or tub-style varieties have too much moisture and will not provide the structural integrity needed for a clean, piped swirl.
How to store these after frosting?
Place them in the refrigerator in a single layer. Because of the dairy in the frosting, keeping them chilled is the only way to maintain freshness for up to 4 days. If you enjoyed the technique of balancing acidity in our purple velvet cake, you will notice similar ingredient interactions here.
How to tell when the cookies are finished baking?
Remove them from the oven when the edges are set but the centers still look slightly soft. They will finish firming up on the pan as they cool completely.
Is it okay to use cold eggs straight from the fridge?
No, use room temperature eggs. Cold eggs can cause the butter emulsion to break during the initial mixing stage, which negatively impacts the final texture of your dough.
Red Velvet Cupcake Cookies
Ingredients:
Instructions:
Nutrition Facts:
| Calories | 382 kcal |
|---|---|
| Protein | 3.8 g |
| Fat | 17.4 g |
| Carbs | 54.2 g |
| Fiber | 1.1 g |
| Sugar | 38.5 g |
| Sodium | 148 mg |
