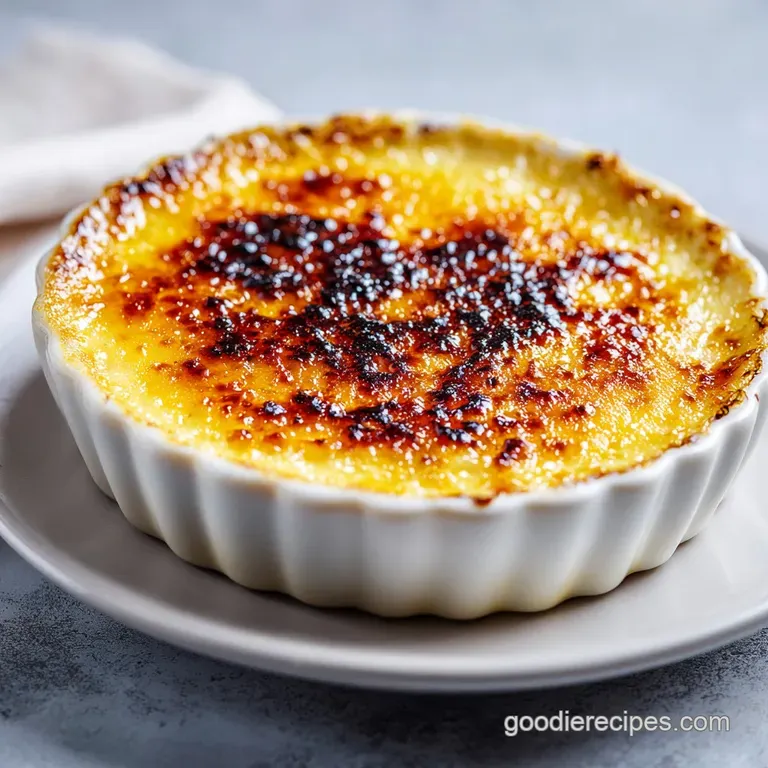
Silky Creme Brulee: Vanilla Custard Perfection
- Time: Active 15 minutes, Passive 4 hours 35 mins, Total 4 hours 50 mins
- Flavor/Texture Hook: Velvety vanilla custard paired with a brittle, caramel shatter topping.
- Perfect for: Sunday family dinners or an impressive holiday dessert.
- Mastering the Classic Vanilla Creme Brulee
- The Science of Coagulation
- Component Analysis
- Essential Ingredients for Traditional Custard
- Necessary Tools for Smooth Success
- Executing the Flawless Custard Bake
- Troubleshooting Texture and Topping Problems
- Scaling the Recipe for Groups
- Ingredient Shortcuts and Alternatives
- Common Culinary Myths
- Storage and Reheating Guide
- Serving Ideas for Better Presentation
- Recipe FAQs
- 📝 Recipe Card
Mastering the Classic Vanilla Creme Brulee
The first time I tried to make this at home, I was huddled over a tiny kitchen scale, terrified I’d mess up the egg to cream ratio. I remember the kitchen smelled like warm milk and expensive vanilla, a scent so heavy you could almost taste it.
Then came the torch a cheap hardware store model I’d borrowed from a neighbor. When that flame hit the sugar, the sizzle was immediate, and the aroma of bitter sweet caramel filled the air.
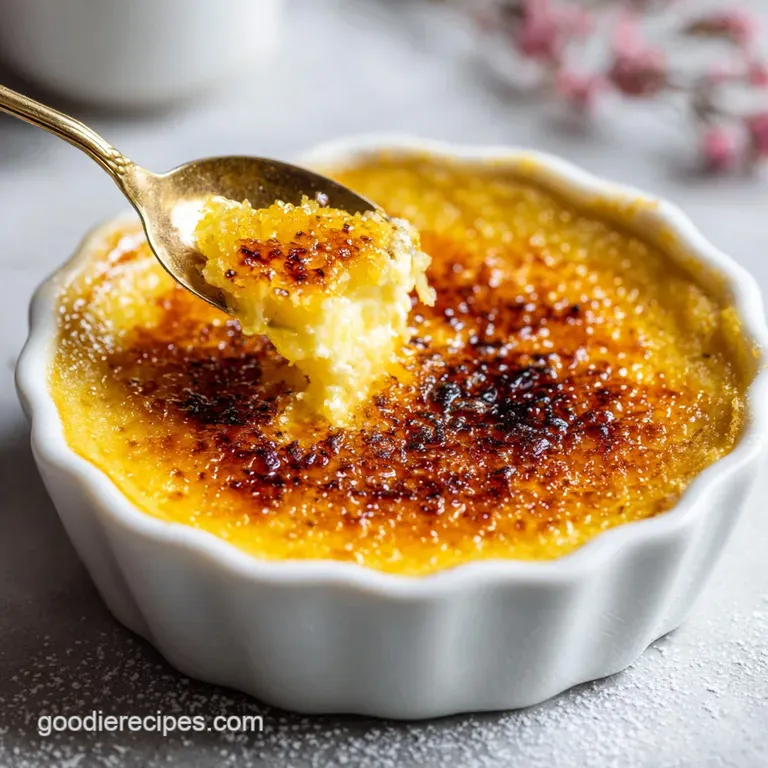
I held my breath, tapped the back of a spoon against the surface, and heard that iconic clink clink shatter.
That moment changed my perspective on home cooking. It wasn't about fancy restaurant equipment; it was about the patience required for a gentle bake. We’ve all had those custards that taste more like sweet scrambled eggs, or tops that are soggy instead of crisp.
I’ve spent years tweaking the temperature and the sugar types to make sure that doesn't happen to you. It’s about the quiet confidence of knowing exactly when the custard has that slight "jiggle" in the center.
We are going to skip the shortcuts and focus on the traditional method because, honestly, the family deserves that classic experience. You don’t need a culinary degree to pull this off, just a bit of focus during the tempering stage.
Let’s get your ramekins ready because we are about to make something truly special. Trust me, once you hear your friends crack into that sugar crust, you’ll never look at a store-bought dessert the same way again.
The Science of Coagulation
Protein Tempering: By slowly whisking hot cream into egg yolks, you raise their temperature gradually to prevent the proteins from clumping into lumps. This ensures the finished custard remains velvety and smooth rather than curdled.
Comparison: Fast vs Classic Methods
| Method | Time | Texture | Best For |
|---|---|---|---|
| Stovetop (Fast) | 15 minutes | Thick but pudding like | Quick cravings |
| Water Bath (Classic) | 35 minutes | Silky and delicate | Traditional finish |
| Broiler (No torch) | 5 minutes | Uneven caramelization | Torch free homes |
When you choose the classic water bath method, you are using the water to insulate the ramekins. This keeps the edges of the custard from overcooking while the center reaches the ideal temperature. It’s the same care I put into my Fruit Tart Recipe to make sure every bite is consistent and lush.
Component Analysis
| Ingredient | Science Role | Pro Secret |
|---|---|---|
| Heavy Cream | Provides fat for a silky mouthfeel | Use minimum 36% fat for the best structure |
| Egg Yolks | Acts as a thickening agent through protein bonds | Strain them to remove the chalazae for total smoothness |
| Granulated Sugar | Stabilizes the egg proteins during the bake | Whisk immediately into yolks to prevent "burning" the eggs |
Essential Ingredients for Traditional Custard
- 2 cups heavy cream: This is the backbone of the dish. It needs a high fat content (minimum 36% fat) to carry the vanilla flavor and create that luxurious weight on the tongue. Why this? low-fat versions won't set properly and will feel watery.
- 5 large egg yolks: These provide the structure and the golden color. We only want the yolks; the whites would make the custard too rubbery. Why this? Yolks provide lecithin which creates a stable emulsion.
- 0.5 cup granulated sugar: This goes into the base to sweeten and help the eggs withstand the heat of the oven.
- 1 tsp pure vanilla extract: For that deep, floral aroma that defines a good creme brulee.
- 0.125 tsp salt: A tiny pinch to balance the sugar and intensify the creaminess.
- 6 tbsp superfine sugar: Specifically for the topping. It melts faster and more evenly than standard granulated sugar.
Chef Tip: Freeze your butter for 10 minutes before making any side pastries, but for this custard, make sure your eggs are at room temperature. It helps the sugar dissolve much faster and prevents the cream from shocking the yolks.
Necessary Tools for Smooth Success
You really can't skip the water bath, so make sure you have a high sided roasting pan that can hold at least an inch of water. You’ll also need six 4 to-6 ounce ramekins. If you use deep ramekins, the custard might take longer to bake, so wide and shallow is usually the way to go for the best sugar to custard ratio.
A fine mesh sieve is your best friend here. No matter how well you whisk, there are always tiny bits of egg or bubbles that can ruin the texture. Straining the mixture into a clean pitcher before pouring it into the ramekins is the difference between an amateur attempt and a professional result.
Finally,, while a broiler can work in a pinch, a kitchen torch gives you the precision needed to avoid scorching the edges of the ramekin.
Executing the Flawless Custard Bake
- Preheat and Prep. Set your oven to 300°F (150°C). Place your six ramekins inside a large roasting pan, making sure they aren't touching each other.
- Infuse the Cream. In a small saucepan, heat the 2 cups heavy cream and 0.125 tsp salt over medium heat. Wait until tiny bubbles form around the edges—do not let it reach a rolling boil.
- Whisk the Yolks. While the cream heats, whisk the 5 large egg yolks and 0.5 cup granulated sugar in a medium bowl. Whisk until the mixture turns pale yellow and slightly thickened.
- Temper the Mixture. Slowly pour about a quarter cup of the hot cream into the yolk mixture while whisking constantly. Note: This prevents the eggs from scrambling.
- Combine Everything. Gradually add the remaining cream to the yolks, whisking gently. Stir in the 1 tsp pure vanilla extract.
- Strain for Smoothness. Pour the custard through a fine mesh sieve into a large liquid measuring cup or pitcher. Look for any tiny cooked egg bits and discard them.
- Fill the Ramekins. Divide the mixture evenly among the ramekins. If you see bubbles on the surface, quickly run the flame of your torch over them to pop them.
- The Water Bath. Carefully pour hot water into the roasting pan until it reaches halfway up the sides of the ramekins. Bake 35 minutes until the edges are set but the center still jiggles slightly.
- The Long Chill. Remove ramekins from the water bath and let them cool to room temperature. Cover with plastic wrap and refrigerate for at least 4 hours (or overnight).
- The Torch Finish. Just before serving, sprinkle 1 tbsp superfine sugar over each custard. Torch the surface using circular motions until the sugar melts and turns a deep amber brown.
Troubleshooting Texture and Topping Problems
Why Your Custard is Still Liquid
If your creme brulee hasn't set after the cooling period, it usually means the internal temperature didn't hit 170°F during the bake. This often happens if the water in your water bath was cold when you started. Always use hot (but not boiling) tap water to give the oven a head start.
The Sugar Won't Harden
If you torch the sugar and it stays soft or tacky, you might have used too much sugar, or your custard was still damp on top. Moisture is the enemy of a crisp crust. Use a paper towel to gently blot any condensation off the top of the chilled custard before you sprinkle the sugar.
| Problem | Root Cause | Solution |
|---|---|---|
| Curdled texture | Oven too hot or no water bath | Bake at exactly 300°F and always use a water bath |
| Burnt sugar smell | Torch held in one spot too long | Keep the torch moving in constant, fluid circles |
| Oily surface | Cream separated during heating | Don't let the cream boil; keep it at a gentle simmer |
Common Mistakes Checklist
- ✓ Never skip straining the custard through a sieve.
- ✓ Don't over whisk the eggs; you want to avoid incorporating too much air.
- ✓ Always dry the surface of the chilled custard before adding sugar.
- ✓ Let the sugar crust sit for 2 minutes after torching to fully harden.
- ✓ Use a kitchen torch rather than the broiler if you want an even, glass like finish.
Scaling the Recipe for Groups
To make a larger batch for a family gathering, you can easily double the ingredients. Use 4 cups heavy cream, 10 egg yolks, and 1 cup sugar for the base. When doubling, you will likely need two roasting pans and two separate shelves in the oven.
Keep in mind that having more liquid in the oven can increase the humidity, so you might need to extend the bake time by about 5 minutes.
If you are scaling down for a quiet night in, you can halve the recipe. Use 1 cup cream and 2 large yolks. Since it's hard to halve an egg, I usually beat one egg in a small bowl and use about 1.5 tablespoons of it to replace the "half" yolk.
Use smaller ramekins or just bake two larger ones, but check for doneness around the 25 minute mark since less mass cooks faster.
Ingredient Shortcuts and Alternatives
| Premium | Budget | Flavor Impact | Savings |
|---|---|---|---|
| Vanilla Bean Pod | Vanilla Extract | Less visual "specks" | Save $5-8 |
| Heavy Cream | Half and Half | Less velvety, thinner set | Save $2 |
| Superfine Sugar | Granulated Sugar | Takes longer to melt | Save $1 |
If you find this vanilla version a bit too simple, you might enjoy the bold flavors of my Mint Brownies Recipe. The contrast of the cool mint and the rich chocolate is a great follow up for a different dinner party.
Common Culinary Myths
One major myth is that you must use a blowtorch to get the right crust. While a torch is definitely better, you can use a broiler on its highest setting. The trick is to keep the ramekins as close to the element as possible and watch them like a hawk.
It won't be as even, but it will still give you that satisfying "crack."
Another misconception is that the custard continues to cook significantly after you pull it out of the oven. While there is a tiny bit of carryover heat, the water bath actually stops the cooking process fairly quickly once removed from the hot water.
This is why it’s so important to pull them when they still have a "wobble" like Jell O. If they look solid in the oven, they will be overcooked by the time they hit the fridge.
Storage and Reheating Guide
Storage: You can keep the un torched custards in the fridge for up to 3 days. Keep them tightly covered with plastic wrap to prevent them from picking up any "fridge smells." Do not torch the sugar until you are ready to eat, as the sugar will eventually absorb moisture from the custard and turn into a sticky syrup.
Zero Waste Tip: Don't throw away those 5 egg whites! You can store them in an airtight container in the fridge for 2 days or freeze them for up to 3 months. They are perfect for making a quick omelet the next morning or a batch of light meringues to serve alongside your creme brulee.
Serving Ideas for Better Presentation
When you're ready to serve, don't just put the ramekin on the table. Place it on a small saucer with a decorative napkin underneath. It looks more professional and prevents the ramekin from sliding around while your guests are trying to break through the sugar.
A few fresh raspberries or a sprig of mint on the side provides a pop of color and a tart contrast to the rich cream. If you want to go the extra mile, a light dusting of powdered sugar around the rim of the plate adds a nice touch of elegance for a family celebration.
The key is to serve it immediately after torching so the contrast between the cold custard and the warm, brittle sugar is at its peak.

Recipe FAQs
What is crème brûlée made of?
The base is rich egg custard topped with hardened caramelized sugar. It primarily requires heavy cream, egg yolks, sugar, and vanilla for the classic flavor profile.
Is crème brûlée just egg custard?
No, the topping is essential to the definition. While the base is a baked custard thickened with egg yolks, the signature element is the brittle, freshly burnt sugar crust.
Is crème brûlée basically flan?
No, they have distinct textural differences. Flan is baked with the caramel already in the bottom, creating a sauce when inverted, whereas crème brûlée has a distinct, hard sugar layer applied right before serving.
What is the secret to crème brûlée?
The secret is controlling the protein coagulation using a low, slow water bath. This gentle baking ensures a silky, velvety texture rather than a curdled or grainy one.
How do I prevent my crème brûlée from curdling?
Temper the egg yolks slowly with the hot cream before baking. Whisking the hot liquid into the yolks gradually raises their temperature, preventing the proteins from seizing up immediately.
Can I make the custard ahead of time?
Yes, chilling the un torched custard is highly recommended. Keep them covered in the refrigerator for up to three days, but only apply the sugar crust immediately before serving.
Should I use the broiler instead of a kitchen torch for the topping?
No, a kitchen torch provides superior control for an even finish. While the broiler can melt the sugar, it often heats the custard underneath, leading to an uneven crust or softening the base.
Silky Creme Brulee Classic
Ingredients:
Instructions:
Nutrition Facts:
| Calories | 431 kcal |
|---|---|
| Protein | 3.9 g |
| Fat | 32.6 g |
| Carbs | 31.9 g |
| Fiber | 0 g |
| Sugar | 29.2 g |
| Sodium | 74 mg |
