Chocolate Covered Strawberries with Shatter Crisp Shell

- Time: Active 15 minutes, Passive 5 minutes, Total 20 minutes
- Flavor/Texture Hook: Shatter crisp dark chocolate meets juicy, tart fruit
- Perfect for: Anniversary celebrations, festive hosting, or a sophisticated weeknight treat
- Mastering the Classic Chocolate Covered Strawberries
- The Science of the Snap
- Component Analysis for Fruit Dipping
- Elements for a Silky Coating
- Tools for a Clean Finish
- Creating the Iconic Chocolate Dip
- Solving Common Dipping Flaws
- Flavor Swaps and Artistic Toppings
- Freshness and Saving Extra Berries
- Ideal Pairings for Sweet Bites
- Recipe FAQs
- 📝 Recipe Card
Mastering the Classic Chocolate Covered Strawberries
That first bite is everything. You hear a distinct "snap" as the tempered chocolate shell yields, followed immediately by the cool, vibrant burst of strawberry juice. It is a sensory contrast that never gets old. I remember the first time I tried making these for a family brunch years ago.
I was in such a rush that I rinsed the berries and dipped them while they were still slightly damp. It was a tragedy, the chocolate simply slid off the fruit like a wet raincoat, leaving a muddy mess on the parchment paper. I learned that day that patience is the most important ingredient in this kitchen.
We are aiming for a professional finish here, the kind you see in high end boutique windows. You don't need a degree in pastry arts to get that mirror like sheen or the delicate drizzle on top. It comes down to a few basic principles of physics and some very dry fruit.
Once you understand how the fats in the chocolate interact with heat, you'll be able to whip these up for any occasion without the stress of "blooming" or grainy textures. This recipe is the foundation for a dozen variations, but we'll start with the gold standard that my family requests every single holiday.
The beauty of this method lies in its simplicity. We are using semi sweet chocolate for that deep, sophisticated bitterness that balances the natural sweetness of the berries. We add a tiny bit of coconut oil to help the chocolate flow more smoothly, ensuring a thin, elegant coating rather than a thick, clunky layer.
Whether you are prepping these for a romantic evening or just want to treat yourself after a long week, these steps will give you a result that looks and tastes like it came from a professional kitchen. Let's get into the details that make the difference.
The Science of the Snap
Understanding the "how" behind the dip ensures you never end up with dull, tacky chocolate.
- Surface Tension: Drying the fruit completely allows the chocolate to "grab" the skin of the berry, preventing the natural oils and moisture from creating a barrier.
- Fat Stabilization: Refined coconut oil lowers the melting point of the chocolate just enough to create a velvety mouthfeel while maintaining a firm structure at room temperature.
- Latent Heat: Cooling the berries gradually after dipping prevents "sugar bloom," which happens when sudden temperature shifts cause moisture to condense and dissolve the sugar in the chocolate.
| Method | Prep Time | Texture Result | Best Used For |
|---|---|---|---|
| Fast Method | 10 minutes | Softer, matte finish | Immediate snacking |
| Classic Method | 20 minutes | High gloss, firm snap | Gifting and displays |
| Freezer Method | 5 minutes | Hard shell, icy fruit | Hot summer days |
Choosing the right approach depends on how long you need the treats to sit out. If you are serving them at a party, the classic method is the only way to go to ensure they don't turn into a sticky mess on the platter.
Component Analysis for Fruit Dipping
| Ingredient | Science Role | Pro Secret |
|---|---|---|
| Semi Sweet Chocolate | Provides the structural shell | Chop finely to ensure even melting without hot spots |
| Refined Coconut Oil | Emulsifies the cocoa solids | Use "refined" to avoid adding any unwanted tropical scent |
| Fresh Strawberries | Acidic counterpoint to fat | Keep stems attached to use as a natural dipping handle |
A common mistake is using chocolate chips, which often contain stabilizers that prevent them from melting into a truly fluid state. For the most velvety result, look for high-quality baking bars.
Elements for a Silky Coating
- 1 lb fresh strawberries: Look for firm, ruby red berries without soft spots or bruises.
- 8 oz semi sweet chocolate: A bar with at least 60% cocoa provides the best flavor balance.
- 1 tsp refined coconut oil: This is our secret weapon for a professional, glossy sheen.
- 2 oz white chocolate: This is strictly for the decorative drizzle that adds that "boutique" look.
Chef's Tip: If you find your chocolate is too thick, add coconut oil in 1/4 teaspoon increments. Do not add water or liquid flavorings, as even a drop will cause the entire bowl to "seize" into a gritty paste.
Tools for a Clean Finish
You don't need fancy equipment, but a few specific items make the process much cleaner. A small, deep microwave safe bowl is better than a wide one because it creates a deeper pool for dipping.
You'll also need parchment paper or a silicone baking mat; chocolate sticks to wax paper, which can ruin the bottom of your berries. A fork or a small piping bag (or even a sandwich bag with the corner snipped) is essential for the white chocolate drizzle.
Finally, a clean kitchen towel or paper towels are mandatory for drying the berries until they are bone dry.
Creating the Iconic Chocolate Dip
Adhesion and Moisture Control
The very first step is to wash your 1 lb of fresh strawberries and dry them meticulously. I usually lay mine out on a thick towel for at least 30 minutes. Even a microscopic amount of water will prevent the chocolate from sticking.
Do not remove the green hulls; they act as a natural handle and keep the juice inside the berry.
Melting and Dipping Process
Chop your 8 oz of semi sweet chocolate into uniform bits. Place them in a bowl with 1 tsp of refined coconut oil. Microwave in 15 second intervals, stirring thoroughly between each. Stop when there are still a few small lumps left; the residual heat will melt them as you stir.
This prevents the chocolate from scorching, which happens faster than you'd think.
Setting the Final Shell
Hold a strawberry by the stem and submerge it into the melted chocolate. Give it a gentle swirl to ensure even coverage. As you lift it out, let the excess chocolate drip back into the bowl. I like to lightly tap my wrist to encourage the extra to fall off. Place the berry onto a parchment lined tray.
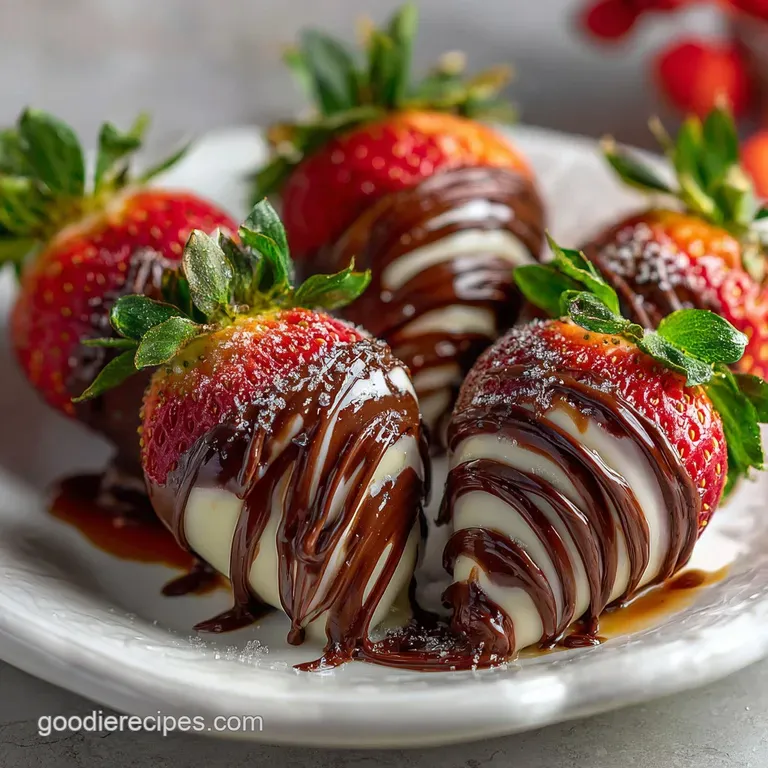
Drizzling for Professional Look
Melt the 2 oz of white chocolate in a separate small bowl using the same 15 second interval method. Once it is fluid, use a spoon or a small bag to create thin zig zags across the set dark chocolate. If you are feeling festive, this is the time to add crushed nuts or sprinkles before the drizzle sets completely.
Solving Common Dipping Flaws
Sweating and Moisture Beads
If you notice little beads of water forming on the chocolate, your fridge is too cold or the berries were too warm when they went in. This is called "sweating." It doesn't ruin the taste, but it dulls the shine.
To prevent this, let the berries sit at room temperature for 15 minutes after dipping before moving them to the fridge.
Chocolate Shell Sliding Off
This is almost always due to moisture on the berry's skin before dipping. If it happens mid batch, stop and re dry your fruit with a fresh paper towel. Another cause can be the temperature of the chocolate; if it is too hot, it becomes too thin to cling to the fruit properly.
Fixing Seized Lumpy Chocolate
If a drop of water gets into your bowl, the chocolate will turn into a clump. You can sometimes save this by adding more coconut oil and stirring vigorously, but it may never be thin enough for dipping. In that case, use it as a base for something like my Brown Butter Toffee recipe where a thicker chocolate component works well.
| Problem | Root Cause | Solution |
|---|---|---|
| Dull Finish | Chocolate was overheated | Melt slower and use residual heat to finish |
| Thick Coating | Chocolate is too cold | Re heat for 5-10 seconds and stir |
| Grey Streaks | Fat separation (bloom) | Ensure chocolate is stored in a cool, dry place |
Common Mistakes Checklist
- ✓ Never dip cold berries; let them reach room temperature first to prevent condensation.
- ✓ Use refined coconut oil specifically; unrefined adds a heavy coconut scent.
- ✓ Avoid plastic bowls for melting as they can retain moisture and heat unevenly.
- ✓ Don't skip the "drip" step; removing excess prevents those large chocolate "puddles" at the base.
- ✓ Store finished berries in a single layer to avoid crushing the delicate drizzle.
Flavor Swaps and Artistic Toppings
While the semi sweet version is a classic, you can easily adapt this recipe. If you want a more festive look, try using the technique from my Peppermint Sugar Cookies recipe by adding crushed candy canes to the white chocolate drizzle. It adds a refreshing crunch that pairs surprisingly well with the fruit.
| Original Ingredient | Substitute | Why It Works |
|---|---|---|
| Semi Sweet Chocolate | Milk Chocolate | Sweeter and creamier. Note: Sets softer than dark chocolate |
| Coconut Oil | Cocoa Butter | Provides a firmer snap and more neutral flavor profile |
| White Chocolate | Peanut Butter Chips | Adds a salty, nutty contrast to the sweet berries |
Another fun variation is a "Double Dip." Dip the berry halfway in dark chocolate, let it set, then dip the tip into white chocolate or even crushed pistachios. The layers look incredible when served on a white marble platter.
Freshness and Saving Extra Berries
Storage Guidelines Chocolate Covered Strawberries are best the day they are made. Because strawberries are mostly water, they begin to release moisture inside the shell after about 24 hours. Keep them in a cool, dry place.
If you must refrigerate them, place them in a container lined with paper towels to absorb any condensation. They will stay fresh for up to 2 days, but the "snap" will soften over time.
Zero Waste Tips If you have leftover melted chocolate, don't throw it out! Pour it onto a piece of parchment paper and sprinkle on any leftover crushed nuts or dried fruit to make a quick "mendiant" or chocolate bark.
If you have berries that are too small or bruised to dip, chop them up and fold them into a batch of rice pudding for a fruity twist.
Ideal Pairings for Sweet Bites
These berries are a standout on their own, but they also play well with others. They are the ultimate accompaniment to a glass of dry sparkling wine or a rich espresso. If you are building a dessert board, I highly recommend placing them alongside some salty elements like pretzels or Marcona almonds to balance the sugar.
If you are looking for a more substantial dessert spread, these berries pair beautifully with a citrus forward cake or even a simple shortbread. The acidity of the fruit cuts through the richness of buttery baked goods, making the entire experience feel lighter.
I often serve these at the end of a heavy meal because they provide that hit of sweetness without leaving everyone feeling overly full. It's a classic for a reason, and once you get that snap right, you'll find yourself making them for every celebration.

Recipe FAQs
What is the secret to chocolate covered strawberries?
Complete dryness of the fruit. The secret lies in ensuring the strawberry surface has absolutely no moisture or oils; any water causes the chocolate to slide off or seize.
How to get strawberries to stick to chocolate?
Ensure strawberries are fully dry and at room temperature. Washing them and letting them air dry for at least 30 minutes creates the best surface tension for the melted chocolate to adhere strongly.
What kind of chocolate is best for chocolate covered strawberries?
high-quality baking bars, usually 60% or higher semi sweet. Chocolate chips contain stabilizers that prevent them from melting smoothly enough for that professional, glossy coat.
Do strawberries need to be cold before dipping in chocolate?
No, they should be at room temperature. Dipping cold berries risks condensation forming on the surface when they meet the warm chocolate, leading to a dull, wet finish.
Is it true that I must temper chocolate for a hard shell?
No, you can use refined coconut oil for stability instead of traditional tempering. Adding about 1 tsp of coconut oil per 8 oz of chocolate provides a lower melting point and glossy finish without the precise temperature control required for true tempering.
How to achieve a thin, glossy chocolate coating rather than a thick one?
Add a small amount of refined coconut oil and let excess chocolate drip off. The oil thins the viscosity, allowing for an elegant, thin layer; tapping your wrist gently as you lift the berry removes excess pooling.
What should I do if my melted chocolate becomes grainy after stirring?
Stop stirring immediately and add more fat, or reserve it for another use. A grainy texture, or "seizing," usually means water was introduced; you can sometimes save it by stirring in more coconut oil, or use the mixture in a sturdy bake like the No-Bake Energy Bite recipe.
Chocolate Covered Strawberries Recipe

Ingredients:
Instructions:
Nutrition Facts:
| Calories | 115 kcal |
|---|---|
| Protein | 1.1 g |
| Fat | 6.3 g |
| Carbs | 13.9 g |
| Fiber | 1.2 g |
| Sugar | 11.5 g |
| Sodium | 5 mg |
