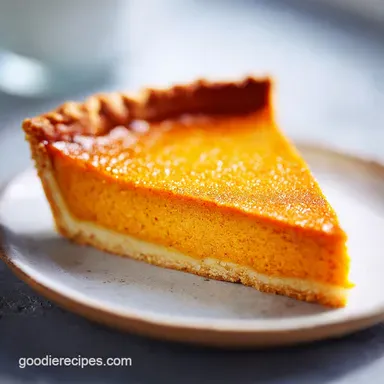
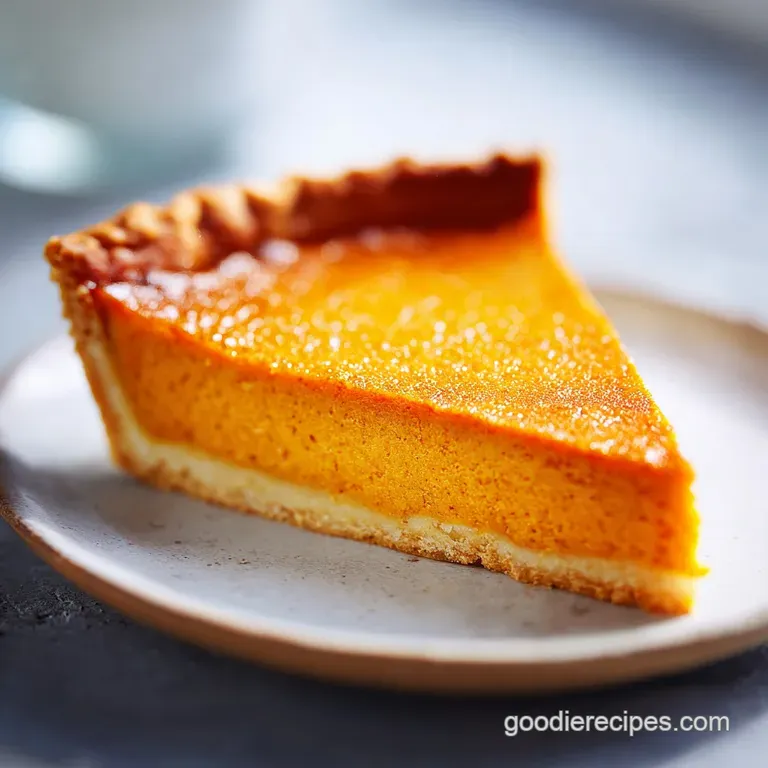
Classic Pumpkin Pie: Silky and Velvety
- Time: 10 min active + 30 min chilling + 77 min baking = Total 4 hours 57 mins
- Flavor/Texture Hook: Shatter crisp crust with a silky, spice forward custard
- Perfect for: Family holiday gatherings and cozy autumn Sundays
The smell of cinnamon and ground cloves hitting a hot oven is, for me, the official start of autumn. Growing up, this wasn't just a dessert; it was a signal that the house was about to be full of loud relatives and the comforting chaos of a family gathering.
I remember watching my grandmother carefully roll out the dough, her hands dusted in flour, explaining that the secret wasn't in the fancy spices, but in the patience of the cool down.
In the early days of American settlers, they didn't even have a crust; they just baked the pumpkin with honey and spices in a pot. Over time, it evolved into the slice of nostalgia we know today. A classic pumpkin pie represents more than just a recipe; it's a cultural anchor that brings everyone back to the table.
When you make this from scratch, you're joining a long line of home cooks who've obsessed over the wobble of the center and the flake of the crust.
This version focuses on reliability. We're using a few smart shortcuts, like evaporated milk, to get that professional consistency without needing a culinary degree. You can expect a rich, dense filling that doesn't weep and a crust that actually stays crisp under the weight of the custard. Let's crack on.
Classic Pumpkin Pie
The magic of a classic pumpkin pie happens when the fats in the butter and the proteins in the eggs hit that sweet spot of coagulation. If you've ever had a pie that felt more like a pudding than a cake, it's usually because the eggs didn't set or there was too much moisture in the pumpkin.
By pre baking the crust, we create a moisture barrier that stops the bottom from becoming a soggy mess.
Trust me on this, the evaporated milk is the real hero here. It's more concentrated than regular milk, which means you get a creamier mouthfeel without adding so much liquid that the pie fails to set. It's the difference between a filling that feels "wet" and one that feels velvety.
The Texture Secrets:
- Cornstarch Stabilizer: A small amount of starch binds the water in the pumpkin, preventing the filling from separating.
- Temperature Control: Baking at 350°F ensures the edges set before the top overcooks and cracks.
- The Rest Period: Cooling for 3 hours allows the custard to fully bond, which is when the texture transforms from "jiggly" to "silky".
- Cold Fat Integration: Keeping butter ice cold ensures it creates steam pockets, which is what makes the crust shatter upon impact.
Before we get into the grit of the recipe, it's helpful to know whether you should go for fresh pumpkin or the convenient canned stuff. Most people think fresh is always better, but for a classic pumpkin pie, consistency is king.
| Feature | Fresh Pumpkin | Canned Purée | Impact on Pie |
|---|---|---|---|
| Prep Time | 1 hour (roasting) | 0 minutes | Canned is significantly faster |
| Moisture | Variable | Standardized | Canned prevents "weeping" |
| Flavor | Earthy and raw | Concentrated | Canned is more consistent |
| Cost | Lower | Slightly higher | Minimal difference per pie |
One thing I've learned the hard way is that fresh pumpkin can be wildly unpredictable. One pumpkin might be watery, while the next is dry as a bone. If you use fresh, you have to strain it through a cheesecloth for hours. For a stress free holiday, canned pure pumpkin is the way to go.
Component Analysis
| Ingredient | Science Role | Pro Secret |
|---|---|---|
| Cold Butter | Creating Flakes | Grate it frozen for faster mixing |
| Evaporated Milk | Texture Density | Shake the can well before pouring |
| Cornstarch | Moisture Binder | Whisk it with sugar to avoid lumps |
| Large Eggs | Structure | Room temp eggs blend more smoothly |
The Essential Ingredients
For the crust, we're keeping it traditional. You'll need 1.5 cups of all purpose flour, 0.5 tsp salt, and 1 tbsp granulated sugar. The fat is 0.5 cup cold unsalted butter, cubed, and 4 tbsp ice water.
For the filling, grab 15 oz pure pumpkin purée (not pumpkin pie filling, which has added sugar) and 3 large eggs. You'll need 0.75 cup packed light brown sugar for that deep, molasses note, and 1 tbsp cornstarch.
The spices are 1 tsp ground cinnamon, 0.5 tsp ground ginger, 0.25 tsp ground cloves, and 0.5 tsp salt. Finally, 12 oz evaporated milk ties it all together.
| Original Ingredient | Substitute | Why It Works |
|---|---|---|
| Evaporated Milk (12 oz) | Heavy Cream (12 oz) | Higher fat content. Note: Results in a much richer, denser filling |
| Brown Sugar (0.75 cup) | White Sugar (0.75 cup) | Same sweetness. Note: Loses the caramel notes and deeper color |
| All Purpose Flour (1.5 cups) | Pastry Flour (1.5 cups) | Lower protein. Note: Makes the crust even more tender but less stable |
It's worth mentioning that if you're craving something equally decadent but completely different for a party platter, my baked cheesecake is a great companion to this pie.
Simple Tools Required
You don't need a fancy kitchen to pull this off. A 9 inch deep dish pie plate is the only specialized equipment required. You'll also need a mixing bowl, a whisk, and a rolling pin (though a wine bottle works in a pinch).
I highly recommend using parchment paper and pie weights (or dried beans) for the blind bake. If you don't have weights, the crust will likely slump down the sides of the pan, and you'll end up with a thick, doughy ring around the edge.
A simple spatula is also handy for smoothing the top of the filling to get that clean, professional finish.
The step-by-step Method
Phase 1: Crafting the Foundation
- Combine flour, salt, and sugar in a mixing bowl. Cut in cold butter until the mixture resembles coarse crumbs. Note: Don't overwork the butter; you want visible pea sized lumps for a flaky crust.
- Add ice water one tablespoon at a time until the dough just holds together. Note: Stop adding water as soon as the dough clumps; too much water makes the crust tough.
- Wrap the dough in plastic and refrigerate for 30 minutes. Note: This relaxes the gluten and prevents the crust from shrinking in the oven.
- Roll out to a 12 inch circle and fit into a 9 inch deep dish pie plate. Note: Press it gently into the corners without stretching the dough.
- Line the crust with parchment and weights. Bake at 375°F (190°C) for 12 minutes, remove weights, and bake for 5 more minutes. until the bottom looks matte and dry.
Phase 2: Mixing the Custard
- In a large bowl, whisk together brown sugar, cornstarch, cinnamon, ginger, cloves, and salt. Note: Mixing the cornstarch with the sugar prevents it from clumping when liquid is added.
- Beat in the eggs one by one, then stir in the pumpkin purée until the mixture is smooth. Note: Use a whisk to ensure there are no pockets of plain pumpkin.
- Gradually pour in the evaporated milk, whisking steadily until the batter is glossy. Note: Pour slowly to avoid creating too many air bubbles in the filling.
Phase 3: The Final Bake & Set
- Pour the pumpkin mixture into the pre baked crust and smooth the top with a spatula. Note: Do this right before it goes into the oven to prevent the crust from absorbing moisture.
- Bake at 350°F (175°C) for 50-60 minutes, removing the pie when the edges are set but the center still wobbles slightly. until the edges are puffed and a knife inserted 2 inches from the edge comes out clean.
- Allow the pie to cool completely on a wire rack for at least 3 hours before slicing. Note: Slicing too early will cause the center to collapse.
Chef's Note: To get a truly shatter crisp crust, try freezing your butter for 10 minutes before grating it into the flour with a box grater. This ensures the butter stays cold throughout the mixing process, leading to more layers in the final bake.
Solving Common Problems
Getting a classic pumpkin pie right is mostly about managing moisture and heat. Most "failures" aren't actually failures, just physics acting up in your oven.
Troubleshooting Common Issues
| Issue | Solution |
|---|---|
| Why Your Filling Cracked | Surface cracks usually happen because the pie was overbaked or the oven was too hot. When the eggs overcook, they contract and pull away from the edges, creating those unsightly fissures. To avoid thi |
| Why Your Crust Is Soggy | A soggy bottom is almost always caused by skipping the blind bake or not using weights. Without that initial blast of heat, the moisture from the pumpkin filling seeps into the raw dough, steaming it |
| Why Your Filling Weeps | If you see a layer of liquid on top of your classic pumpkin pie, it's called syneresis. This happens when the custard structure breaks down, often due to overmixing the eggs or using a pumpkin purée w |
Common Mistakes Checklist:
- ✓ Did you use pure pumpkin and NOT "pumpkin pie mix"?
- ✓ Was the butter ice cold when it hit the flour?
- ✓ Did the pie cool for a full 3 hours before slicing?
- ✓ Did you remove the pie before the center stopped wobbling?
- ✓ Did you use a deep dish pan to prevent overflow?
Exciting Taste Twists
Once you've nailed the classic pumpkin pie, you can start playing with the profile. I love adding a pinch of freshly grated nutmeg or a teaspoon of orange zest to the filling. The citrus cuts through the richness and makes the whole thing feel lighter.
For a bolder, warm spice profile, try replacing the ground cloves with a pinch of cardamom. It adds a floral, almost peppery note that is common in Scandinavian desserts. If you want a creamier, cheesecake style texture, you can fold in 4 oz of softened cream cheese to the pumpkin purée before adding the milk.
If you're planning a full dessert spread, this pairs wonderfully with a homemade chocolate cake for those who want something more cocoa heavy.
Decision Shortcut:
- If you want a sharper flavor, add 1 tsp of lemon juice.
- If you want a denser texture, replace 2 tbsp of evaporated milk with heavy cream.
- If you want a rustic look, leave the top un smoothed and add a sprinkle of cinnamon.
Saving and Storing
A classic pumpkin pie is actually better the next day because the spices have more time to meld together. For proper storage, let the pie cool completely on the counter first. If you put a warm pie in the fridge, you'll create condensation on the surface, which ruins the velvety texture.
Store the pie in the fridge for up to 4 days. I recommend using a loose cover or a pie dome rather than wrapping it tightly in plastic wrap, which can stick to the filling and pull off a layer when you remove it.
For freezing, this is a bit trickier. You can freeze the unbaked crust for up to 2 months, but I don't recommend freezing the fully baked pie. The texture of the custard can become grainy once thawed. If you must freeze it, slice it first and wrap individual pieces in parchment and foil.
To reheat, let a slice thaw in the fridge overnight and then warm it in a 300°F (150°C) oven for 5-10 minutes.
Regarding zero waste, don't toss the leftover pumpkin purée in the can. You can stir it into your morning oatmeal or blend it into a smoothie with a banana and some cinnamon. Even the leftover crust scraps can be baked into mini crackers with a bit of salt and paprika.
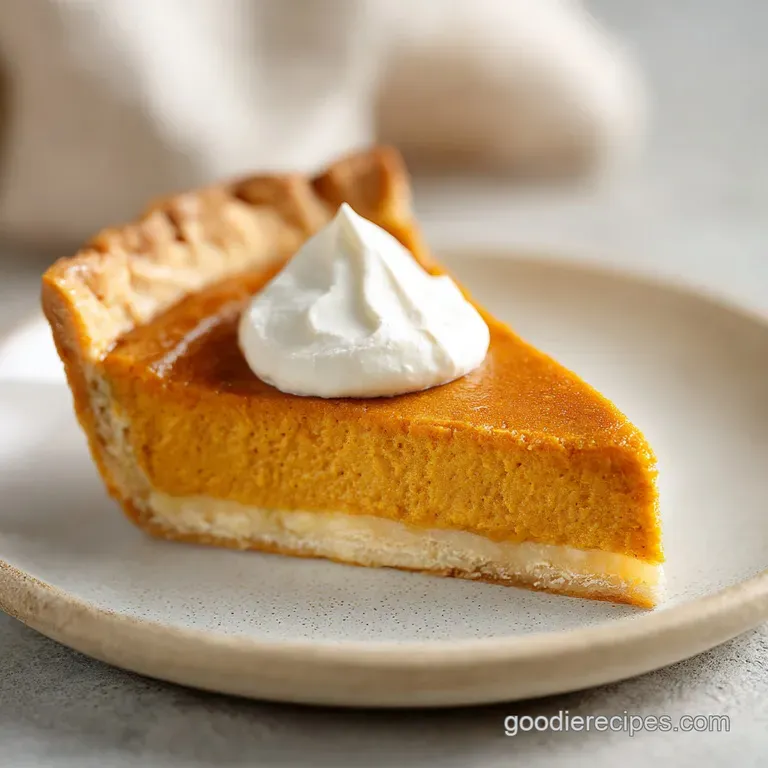
The Final Look
The way you serve a classic pumpkin pie is just as important as the bake. For a professional finish, I always use a warm knife to slice. Run your knife under hot water and wipe it dry between every single cut.
This prevents the filling from sticking to the blade and dragging across the slice, giving you those clean, sharp edges.
A dollop of homemade whipped cream is non negotiable. Instead of the canned stuff, whisk heavy cream with a touch of maple syrup and vanilla bean paste until soft peaks form. The lightness of the cream balances the density of the pie.
For a modern twist, try a "deconstructed" presentation. Place a large scoop of the pumpkin filling in a bowl, top it with a few shards of the baked crust, and drizzle with a salted caramel sauce. It's a great way to use up leftovers while making them feel like a restaurant dessert.
Final Precision Checkpoints:
- Butter Temp: Ensure butter is below 40°F (4°C) before adding to flour.
- Crust Bake: Total 17 minutes at 375°F (190°C) to lock in the structure.
- Doneness: Pull from oven when the center wobbles like Jell O, not like water.
Right then, you've got everything you need. Making a classic pumpkin pie doesn't have to be a source of holiday stress. Just remember to keep your butter cold, don't overbake the center, and for the love of all things autumn, let it cool for three hours.
Your family will thank you, and you'll have a dessert that actually lives up to the tradition. Trust me, it's brilliant.
Recipe FAQs
What is the secret to a good pumpkin pie?
Blind baking the crust and avoiding overbaking the filling. If you enjoyed mastering the temperature precision here, see how the same principle works in our brown butter caramel sauce.
What is the most pumpkin pie filling made of?
Pure pumpkin purée, eggs, evaporated milk, and brown sugar. These ingredients are whisked with cornstarch and a spice blend of cinnamon, ginger, and cloves.
What are common mistakes when making pumpkin pie?
Overbaking the filling and skipping the blind bake. These errors cause the surface to crack and the bottom crust to become soggy.
Which pie is best for diabetics?
A low-sugar variation is best. This classic recipe contains light brown sugar, which may not be suitable for those managing diabetes.
How to prevent the filling from cracking?
Bake at 350°F (175°C) and remove the pie when the center still wobbles slightly. Overcooking causes the eggs to contract and pull away from the edges, creating fissures.
How to ensure the crust isn't soggy?
Blind bake the crust at 375°F (190°C) for 12 minutes with weights, then 5 minutes without. This sets the dough before the wet filling is added, creating a moisture barrier.
Is it true that pumpkin pie must be refrigerated before slicing?
No, this is a common misconception. The pie simply needs to cool completely on a wire rack for at least 3 hours to set properly.
Classic Pumpkin Pie