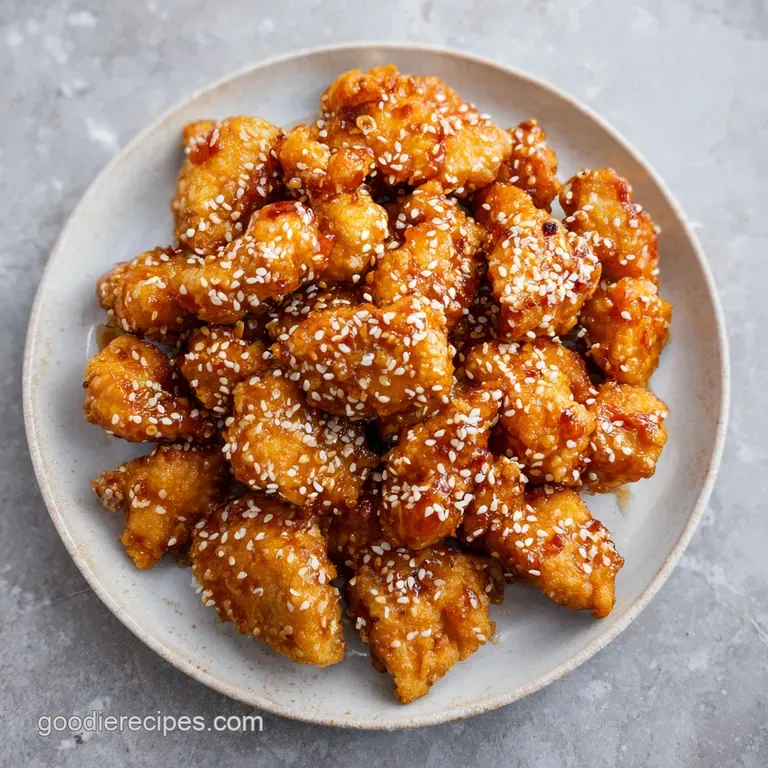
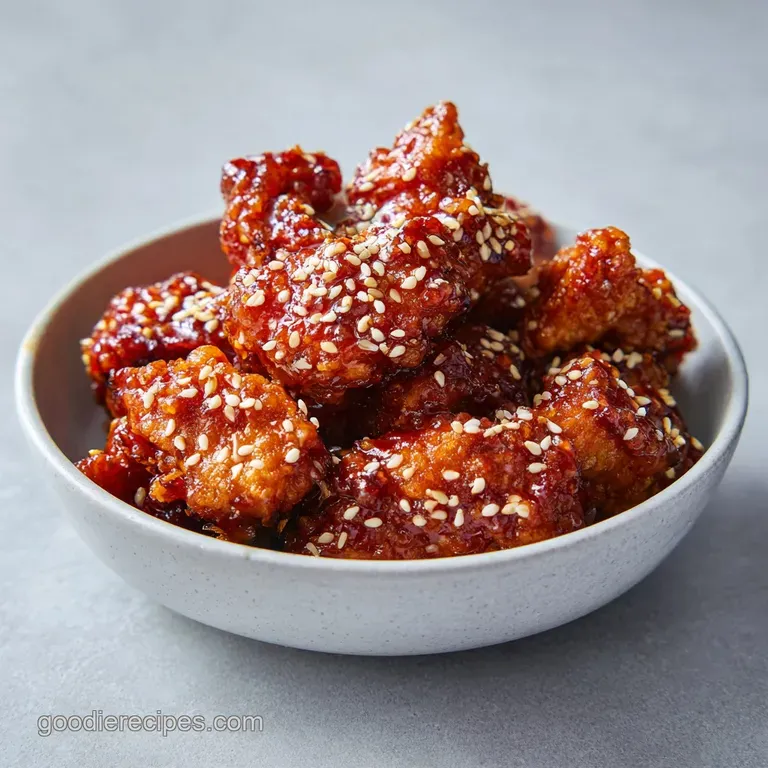
Sesame Chicken: Ultimate and Crispy
- Time:15 minutes active + 20 minutes cook = Total 35 minutes
- Flavor/Texture Hook: Mahogany colored crispy chicken with a velvety, sweet salty glaze
- Perfect for: A budget-friendly weeknight dinner that beats takeout
- Why This Sesame Chicken Recipe Works
- Component Analysis
- Shopping List Breakdown
- Essential Gear Needed
- The Step by Step Process
- Fixing Common Sesame Chicken Issues
- Troubleshooting Common Issues
- Ways to Mix It Up
- Adjusting the Batch Size
- Kitchen Truths and Myths
- Freshness and Storage Tips
- Perfect Sides to Serve
- Critical Level of Sodium
- Recipe FAQs
- 📝 Recipe Card
The sound of chicken hitting hot oil is a sizzle that usually promises a win, but let's be real: most home versions of this dish end up as a soggy, rubbery mess. I remember one night trying to impress some friends where the breading literally slid off the chicken the moment it hit the sauce.
It was a disaster, and we ended up eating what felt like sweetened, wet nuggets.
But that's exactly why I spent so much time figuring out the coating. The trick isn't just about the oil, it's about how the starch interacts with the protein. When you get the ratio right, you get a shell that doesn't just sit on the meat, it bonds to it.
In this guide, we're making a version of Sesame Chicken that actually holds its own. We'll use a budget smart approach with simple pantry staples, but the result is a mahogany colored, glossy dish that tastes like it came from a high end kitchen.
Trust me, once you feel that first shatter crisp bite, you'll never order takeout again.
Why This Sesame Chicken Recipe Works
The Starch Bond: Mixing cornstarch with all purpose flour creates a thinner, crispier crust than flour alone. According to the techniques shared at Serious Eats, cornstarch prevents gluten development, which is what keeps the chicken from becoming bread like or chewy.
The Sugar Glaze: Honey doesn't just add sweetness, it provides the viscosity needed for the sauce to cling. When simmered, the sugars partially caramelize, creating that signature glossy look that encapsulates the protein.
The Batch Method: Frying in small groups prevents the oil temperature from dropping. If you crowd the pan, the chicken steams instead of sears, which is the primary reason for that dreaded sogginess.
The Slurry Finish: Adding a cornstarch slurry at the very end ensures the sauce thickens instantly. This prevents the chicken from sitting in a thin liquid for too long, preserving the crunch.
The Thermal Carryover: Removing the chicken just as it hits a mahogany brown allows the residual heat to finish the center. This keeps the breast meat from turning into rubber.
| Method | Time | Texture | Best For |
|---|---|---|---|
| Stovetop Fry | 20 minutes | Shatter crisp | Maximum flavor |
| Oven Bake | 30 minutes | Chewy crisp | Easier cleanup |
| Air Fryer | 25 minutes | Light crisp | Lower oil |
Right then, before we dive into the gear, let's look at what's actually happening inside the pan.
Component Analysis
| Ingredient | Science Role | Pro Secret |
|---|---|---|
| Cornstarch | Moisture Barrier | Use a 1:1 ratio with flour for the best shatter |
| Honey | Emulsifier/Glaze | Heat it slowly to avoid burning the sugars |
| Rice Vinegar | Acid Balance | Cuts through the fat of the frying oil |
| Sesame Oil | Aromatic Finisher | Add at the end to keep the nutty flavor potent |
Shopping List Breakdown
For this Sesame Chicken, we're sticking to basics. Most of these are likely in your cupboard already, which keeps the cost per serving incredibly low.
For the Crispy Chicken
- 1.5 lb chicken breast, cut into 1 inch cubes Why this? Uniform size ensures even cooking
- 1/2 cup cornstarch Why this? Creates the signature crunch
- 1/2 cup all purpose flour Why this? Adds structure to the coating
- 1 tsp salt Why this? Basic seasoning for the protein
- 1/2 tsp black pepper Why this? Adds a subtle heat
- 1/2 tsp ginger powder Why this? Infuses the meat with warmth
- 1/2 cup vegetable oil Why this? High smoke point for frying
For the Signature Sesame Sauce
- 1/3 cup soy sauce Why this? Deep salt and umami base
- 1/4 cup honey Why this? Natural sweetness and glossy finish
- 2 tbsp rice vinegar Why this? Brightness to balance the honey
- 1 tbsp toasted sesame oil Why this? Essential nutty aroma
- 1 tbsp fresh ginger, minced Why this? Zesty, fresh punch
- 3 cloves garlic, minced Why this? Savory depth
- 1 tbsp cornstarch Why this? Thickens the final glaze
- 1 tbsp water Why this? Dissolves the starch for the slurry
For the Garnish
- 2 tbsp toasted sesame seeds Why this? Visual appeal and texture
- 3 stalks green onions, thinly sliced Why this? Fresh, sharp contrast
If you're looking at the nutrition of the protein, USDA FoodData confirms that chicken breast is a lean, high protein choice, though the frying process adds the necessary fats for that takeout feel.
| Original Ingredient | Substitute | Why It Works |
|---|---|---|
| Honey (1/4 cup) | Maple Syrup (1/4 cup) | Similar viscosity. Note: Adds a distinct maple sweetness |
| Chicken Breast | Chicken Thighs | More fat/flavor. Note: Slightly softer texture |
| Rice Vinegar | Apple Cider Vinegar | Similar acidity. Note: Slightly fruitier profile |
| Cornstarch | Potato Starch | Great crunch. Note: Slightly different thickening power |
Now, don't just throw everything in a pot. The gear you use can actually change how the sauce behaves.
Essential Gear Needed
You don't need a professional kitchen, but a few specific tools make this a lot easier.
First, a large non stick skillet or a wok is non negotiable. You need the surface area to fry in batches. If you use a small pan, you'll be tempted to crowd the chicken, and that's where the sogginess starts.
I usually use a 12 inch skillet because it gives me enough room to move the pieces around without them sticking.
A good whisk is also key. When you make the cornstarch slurry, you can't have any lumps. If you don't have a whisk, a fork works, but you'll have to work twice as hard to get it smooth.
Finally, keep a plate lined with paper towels ready. The moment that chicken comes out of the oil, it needs to drain. If it sits in its own oil, the bottom side will soften, ruining the shatter crisp texture we've worked so hard for.
The step by step Process
Let's crack on. This is where the magic happens.
Phase 1: Coating the Protein
- In a medium bowl, toss the cubed chicken breast with salt, pepper, and ginger powder. Note: Seasoning the meat directly ensures the flavor isn't just on the crust.
- Sprinkle in the flour and cornstarch, tossing until every piece is evenly coated in a thin, powdery layer. Note: Don't overmix or you'll create a paste; you want a dry coating for this Sesame Chicken.
Phase 2: Achieving the Golden Sear
- Heat the vegetable oil over medium high heat in a large non stick skillet or wok until it shimmers. Note: If the oil smokes, it's too hot; turn it down slightly.
- Fry the chicken in batches for 3-5 minutes per side until mahogany colored and firm. Note: Do not crowd the pan; give each piece space to sizzle.
- Remove and drain on paper towels. Note: Let them rest for a minute before tossing in the sauce.
Phase 3: The Glaze and Toss
- In a separate saucepan, combine soy sauce, honey, vinegar, sesame oil, garlic, and ginger.
- Simmer over medium heat for 3-5 minutes until bubbling and slightly reduced. Note: This concentrates the flavors.
- Whisk the cornstarch and water together to create a slurry, then stir it into the simmering sauce, whisking constantly until the glaze thickens and becomes glossy.
- Return the crispy chicken to the pan, tossing quickly over high heat until every piece is encapsulated in sauce.
- Garnish with toasted sesame seeds and sliced green onions.
Fixing Common Sesame Chicken Issues
Even with a plan, things can go sideways. Most of the time, it's a temperature or timing issue.
Troubleshooting Common Issues
| Issue | Solution |
|---|---|
| Chicken soggy | This usually happens because of "crowding." When you put too much chicken in the pan, the temperature of the oil drops instantly. Instead of searing, the chicken releases moisture, and the coating abs |
| Why did the sauce separate or turn clumpy | Clumps happen when cornstarch is added directly to hot liquid. The outside of the starch granule gelatinizes instantly, trapping dry powder inside. Always mix your cornstarch with cold water first to |
| Why is the chicken rubbery | Overcooking is the culprit here. Chicken breast is lean and dries out fast. Since we're frying at high heat, 3-5 minutes per side is usually plenty. Use a meat thermometer to hit 165°F (74°C) and stop |
Common Mistakes Checklist
- ✓ Pat chicken dry before tossing in flour
- ✓ Heat oil until it shimmers, not smokes
- ✓ Fry in batches of 5-7 pieces max
- ✓ Whisk the slurry until completely smooth
- ✓ Toss chicken in sauce for only 30-60 seconds
Ways to Mix It Up
One of the best things about this Sesame Chicken is how adaptable it is. If you're bored of the classic version, you can pivot the flavor profile without changing the technique.
For a spicy kick, add a tablespoon of Sriracha or chili garlic sauce to the simmer. I love adding a pinch of red pepper flakes during the sauce reduction to get a slow burn heat that cuts through the honey. If you want a more citrusy note, swap the rice vinegar for lime juice.
If you're looking for different protein options, this works brilliantly with shrimp or firm tofu. For tofu, press the water out for at least 30 minutes first, or the coating will just slide off. For shrimp, reduce the frying time to about 2 minutes per side.
If you want to switch it up, my Sauce in 10 Minutes recipe is another great way to use these flavors with a broader variety of vegetables. You can essentially use the same frying method for the chicken and then toss it in a different sauce for variety.
Adjusting the Batch Size
When you're cooking for a crowd or just yourself, you can't always just double the ingredients. Some things don't scale linearly.
Cutting it down (1/2 or 1/4 batch): If you're making a single serving, use a smaller pan. Reduce the cooking time by about 20% since smaller batches heat up and cool down faster. For the egg (if you ever use an egg wash), beat one egg in a cup and just pour out half.
Scaling it up (2x-4x batch): This is where people mess up. Do NOT quadruple the salt or the ginger powder. I recommend scaling spices and salt to only 1.5x or 2x, then tasting at the end. Liquids can be reduced by about 10% because you'll have less evaporation in a larger pot.
Most importantly, you must work in batches. If you try to fry 3 lbs of chicken at once, you'll end up with a soggy mess.
| If you want... | Do this... |
|---|---|
| Maximum Crunch | Use the stovetop fry method |
| Less Mess | Use the oven baked method |
| Faster Prep | Prep the sauce while the oil heats |
Kitchen Truths and Myths
There are a few things people say about stir fry and frying that just aren't true.
First, the idea that you need a wok to get "wok hei" (the breath of the wok) at home. While a wok is great, a heavy stainless steel or non stick skillet works perfectly fine for this Sesame Chicken. The "breath" is really just over high heat caramelization, which you can achieve in any pan that holds heat well.
Second, some people claim you should sear the meat to "seal in the juices." This is a myth. Searing creates a crust and adds flavor, but it doesn't stop moisture from leaving the meat. The key to juicy chicken is not "sealing" it, but not overcooking it.
Freshness and Storage Tips
Leftovers are a reality, but the enemy of a crispy dish is the fridge. Moisture is the enemy here.
Storage Guidelines: Store your Sesame Chicken in an airtight container in the fridge for up to 3-4 days. I recommend storing the chicken and the rice separately. If you store them together, the rice will absorb the sauce and the chicken will get soggy.
The Best Way to Reheat: Avoid the microwave if you can. It turns the coating into a sponge. Instead, use an air fryer at 350°F (180°C) for about 3-5 minutes.
If you don't have one, a toaster oven or a dry skillet on medium heat will bring back that shatter crisp texture.
Zero Waste Tips: Don't throw away the ends of your green onions or the garlic skins. I keep a "scrap bag" in the freezer. Once it's full, I simmer all those ends with water and a bit of salt to make a quick vegetable stock for future sauces.
Even the leftover frying oil can be filtered through a coffee filter and reused once or twice for other over high heat cooking.
Perfect Sides to Serve
To balance the richness of the Sesame Chicken, you need sides that provide contrast in both texture and flavor.
The classic pairing is, of course, steamed jasmine rice. The neutral, fluffy grains soak up the extra glossy glaze perfectly. For a lower carb option, cauliflower rice works well, though it doesn't have the same absorbing power.
I also highly recommend adding a steamed green vegetable. Sautéed bok choy or steamed broccoli with a squeeze of lemon provides a fresh, bitter contrast to the sweet honey sauce. It turns a simple meal into a complete dinner.
If you're in the mood for seafood, try my Golden Seared Cod for a different crispy texture to serve alongside a similar rice base. It's a great way to introduce more variety into your weekly rotation while using similar cooking techniques.
Right then, you've got the tools, the science, and the steps. This Sesame Chicken is all about the patience in the frying and the precision in the glaze. Once you stop rushing the batches and start trusting the mahogany color, you'll have a dish that genuinely rivals any takeout spot in town. Let's get cooking!
Critical Level of Sodium
1180 mg 1,180 mg of sodium per serving (51% 51% of daily value)
The American Heart Association recommends a limit of 2,300mg of sodium per day for most adults, and an ideal limit of 1,500mg for those with hypertension.
Tips to Reduce Sodium in Your Chicken Stir Fry
-
Swap the Soy Sauce-30%
Replace the 1/3 cup of soy sauce with low-sodium soy sauce or coconut aminos to dramatically lower the salt content.
-
Eliminate Added Salt-25%
Remove the 1 tsp of salt from the dredging mixture entirely; the sauce provides more than enough sodium for seasoning.
-
Increase Acidity-10%
Add an extra tablespoon of rice vinegar or a squeeze of fresh lime juice to mimic the 'bite' of salt.
-
Amplify Nutty Flavors-5%
Slightly increase the toasted sesame oil or seeds to add richness and depth without adding sodium.
-
Boost Fresh Aromatics
Double the amount of fresh minced ginger and garlic to create a more robust flavor profile that reduces the need for salt.
Recipe FAQs
What are the ingredients in sesame chicken?
Chicken breast, flour, and cornstarch for the coating; soy sauce, honey, rice vinegar, and sesame oil for the glaze. Fresh ginger, garlic, and toasted sesame seeds provide the essential aromatic flavors.
How to prevent the chicken from becoming soggy?
Fry the chicken in small batches. Crowding the pan drops the oil temperature instantly, causing the coating to release moisture and absorb oil instead of searing.
How to stop the sauce from turning clumpy?
Whisk cornstarch with cold water first. Creating this slurry ensures the starch integrates smoothly into the simmering sauce without trapping dry powder inside gelatinized clumps.
Why is my chicken rubbery?
Overcooking the meat is the cause. Stick to frying for 3-5 minutes per side until the chicken is mahogany colored and firm to maintain a tender interior.
How to get the chicken mahogany colored?
Heat vegetable oil over medium high heat until it shimmers. This high starting temperature is critical for achieving a deep brown, crispy exterior quickly.
Is it true that I can add cornstarch directly to the simmering sauce?
No, this is a common misconception. Adding starch directly to hot liquid causes the outside of the granules to seize instantly, which creates lumps in the glaze.
What should I serve with sesame chicken?
Serve it over steamed white rice with a side of steamed broccoli. If you loved the sweet tart balance in this glaze, see how we use a similar flavor profile in our sweet and sour sauce.
Crispy Sesame Chicken

