Instant Pot Bbq Chicken: Foolproof and Sticky
- Time: 5 min active + 15 min cook = Total 30 mins
- Flavor/Texture Hook: Shredded, velvety chicken in a sticky, smoked glaze
- Perfect for: Stress free weeknight dinners or game day sliders
- The Best Instant Pot BBQ Chicken
- Why This Method Works
- Component Analysis
- Ingredients and Smart Swaps
- Necessary Kitchen Tools
- The Step by Step Process
- Solving Common Cooking Issues
- Creative Flavor Twists
- Adjusting the Batch Size
- BBQ Myths Debunked
- Storing and Saving Leftovers
- Plate It Like a Pro
- High in Sodium
- Recipe FAQs
- 📝 Recipe Card
That first hiss of steam when you open the lid, followed by the heavy, sweet scent of smoked paprika and apple cider vinegar, is honestly the best part of my day. I remember the first time I tried a "dump and go" version of this dish. I just threw the sauce and raw meat in and hit start. The result?
A pale, boiled looking chicken swimming in a thin, pinkish soup that tasted more like watered down ketchup than barbecue. It was a total letdown and a waste of good meat.
That's why I stopped trusting the shortcuts. I realized that for the flavors to actually penetrate the meat, you need a bit of effort upfront and a specific finish. You can't just rely on the pressure cooker to do all the work if you want that deep, caramelized taste we all crave.
This version of instant pot bbq chicken fixes every one of those issues. We're focusing on building layers of flavor, from the initial sear to the final reduction. It's a budget friendly approach that uses basic pantry staples to create something that tastes like it's been simmering in a pit for twelve hours.
Trust me, once you do the final sauté step, you'll never go back to the "dump" method.
The Best Instant Pot BBQ Chicken
The magic here is all about managing the moisture. Most people make the mistake of cooking the chicken directly in the BBQ sauce. The problem is that the sauce contains sugars that can burn on the bottom of the pot, triggering that dreaded "Burn" notice, and the chicken releases a ton of water as it cooks, which thins out your sauce.
By using a thin braising liquid first and adding the thick sauce only at the end, we keep the pot happy and the sauce thick.
But what about the texture? If you've ever had rubbery breast meat from a pressure cooker, it's usually because the meat was overcooked or not allowed to rest. We use a natural pressure release here, which lets the fibers relax and reabsorb the juices.
It's the difference between meat that snaps and meat that shreds into those long, velvety strands that soak up every drop of glaze.
Right then, let's get into the specifics of why this actually works. It's not magic, just a bit of kitchen logic.
Why This Method Works
- The Acid Break: Apple cider vinegar breaks down the tough connective tissues in the chicken, making it shred effortlessly without becoming mushy.
- Pressure Infusion: High pressure forces the smoked paprika and garlic powder deep into the protein, rather than just leaving them on the surface.
- The Final Reduction: Sautéing the shredded meat with the sauce at the end evaporates the excess cooking liquid, concentrating the flavor into a sticky glaze.
- Controlled Carryover: A 10 minute natural release prevents the "shock" of sudden depressurization, which keeps the chicken from tightening up and becoming dry.
| Method | Prep Time | Texture | Best For |
|---|---|---|---|
| Instant Pot | 5 minutes | Shredded/Velvety | Fast weeknights |
| Slow Cooker | 10 minutes | Fall apart | All day simmering |
| Oven Roast | 15 minutes | Firm/Sliced | Sunday dinner |
It's interesting to see how different methods change the meat. While the slow cooker is great, the pressure cooker gives us that specific "braised" quality in a fraction of the time.
Component Analysis
| Ingredient | Science Role | Pro Secret |
|---|---|---|
| Apple Cider Vinegar | Tenderizer | Balances the heavy sugar in the BBQ sauce |
| Smoked Paprika | Flavor Base | Adds a "grilled" aroma without a real grill |
| Brown Sugar | Caramelizer | Helps the sauce cling to the meat during the final sauté |
| Chicken Broth | Heat Medium | Prevents the "Burn" notice by providing a liquid layer |
Ingredients and Smart Swaps
For the rub, we're keeping it classic and punchy.
- 2 lbs boneless skinless chicken breasts or thighs Why this? Thighs are more forgiving, but breasts work if you follow the timing.
- 1 tbsp olive oil Why this? High smoke point for the initial sear.
- 1 tsp smoked paprika (Substitute: Sweet paprika + a drop of liquid smoke)
- 1 tsp garlic powder (Substitute: 3 cloves minced fresh garlic)
- 1/2 tsp onion powder (Substitute: Finely grated onion)
- 1/2 tsp salt
- 1/2 tsp cracked black pepper
- 1/2 cup chicken broth (Substitute: Water, but you lose the depth)
- 1/2 cup apple cider vinegar (Substitute: White vinegar or lemon juice)
- 1 tbsp brown sugar (Substitute: Honey or maple syrup)
- 1 1/2 cups BBQ sauce Why this? Use a thick, molasses based sauce for the best stickiness.
- 1 tsp Worcestershire sauce (Substitute: Soy sauce)
Necessary Kitchen Tools
You don't need a fancy arsenal for this, but a few things make it easier. An Instant Pot (6 quart or 8 quart) is the star, obviously. I also highly recommend a set of two forks or a hand mixer for shredding the meat - the mixer is a total cheat code if you're in a rush.
A silicone spatula is also a must. You'll need it to scrape the bottom of the pot during the deglazing phase. If you leave even a tiny bit of burnt rub on the bottom, the sensors might trip and stop your cook mid way.
The step by step Process
Let's crack on with the actual cooking. Keep an eye on the textures as you go.
- Toss the chicken in the olive oil and rub mixture (smoked paprika, garlic powder, onion powder, salt, and pepper) until evenly coated.
- Set the Instant Pot to Sauté (High). Once hot, sear the chicken for 2-3 minutes per side until a brown crust forms, then remove chicken and set aside. Note: This creates fond, which is where the deep flavor lives.
- Deglaze the pot by pouring in the chicken broth and apple cider vinegar, scraping all brown bits from the bottom to prevent the Burn notice.
- Stir in the brown sugar and return the seared chicken to the pot.
- Secure the lid, set the valve to Sealing, and cook on Manual/High Pressure for 10 minutes for breasts or 15 minutes for thighs.
- Allow a 10 minute Natural Pressure Release (NPR) before venting the remaining steam.
- Transfer chicken to a bowl and shred using forks into thick strands.
- Drain the excess liquid from the pot, returning the shredded meat along with the BBQ sauce and Worcestershire sauce.
- Turn on Sauté (Low) for 2-3 minutes, stirring constantly until the sauce is thick and glossy.
Solving Common Cooking Issues
The most common gripe with this recipe is the "Burn" warning. This usually happens because the brown sugar or the rub has scorched on the bottom and wasn't scraped away. If this happens, just release the pressure, stir the bottom thoroughly, add a splash more broth, and restart.
Another issue is the meat coming out dry. This is almost always due to using the "Quick Release" valve instead of waiting for the natural release. When you vent immediately, the moisture is literally sucked out of the meat.
Why Your Chicken Is Dry
If you're using breasts and they feel rubbery, you might have gone too long on the high pressure. Breasts cook faster than thighs and can overdo quickly.
Why Your Sauce Is Watery
This happens if you skip the final sauté step. The liquid in the pot is a braising liquid, not a sauce. You have to boil it down with the BBQ sauce to get that velvet texture.
| Problem | Root Cause | Solution |
|---|---|---|
| Burn Notice | Not enough liquid/scraping | Add 1/4 cup broth and scrape edges |
| Rubbery Meat | Quick release of pressure | Use 10 min Natural Pressure Release |
| Bland Flavor | Skipping the sear | Sear chicken 3 mins per side first |
Common Mistakes Checklist:
- ✓ Always scrape the bottom of the pot after searing.
- ✓ Never add BBQ sauce before the pressure cooking phase.
- ✓ Use the Natural Pressure Release (NPR) for 10 minutes.
- ✓ Drain the braising liquid before adding the final glaze.
- ✓ Stir constantly during the final sauté to avoid sugar burns.
Creative Flavor Twists
Once you've nailed the basic instant pot bbq chicken, you can start playing with the profile. If you're feeling bold with your rub, you could even try a version of my homemade taco seasoning for a fusion vibe that works great on nachos.
For a "Honey Bourbon" twist, swap the brown sugar for 2 tbsp of honey and add a shot of bourbon to the deglazing liquid. The alcohol burns off, but it leaves a woody, rich undertone.
If you want a kick, stir in a tablespoon of chipotle peppers in adobo sauce during the final sauté. This adds a smoky heat that cuts through the sweetness of the BBQ sauce. For those watching their sugar, you can swap the store-bought sauce for a keto friendly version, though you might need a pinch more salt to make up for the lost depth.
Adjusting the Batch Size
When you're cooking for a crowd, you can't just double everything blindly. If you're doubling the recipe to 4 lbs of chicken, don't double the liquids. Use about 1.5x the broth and vinegar. Too much liquid will make it take forever to reach pressure and will make the final reduction step take much longer.
If you're scaling down for just two people, use a smaller pot if you have one. If not, reduce the cooking time by about 20% for breasts, as the smaller mass of meat heats through faster. Always beat your eggs or measure your spices carefully when halving recipes to ensure the balance stays right.
| Batch Size | Liquid Adjustment | Time Adjustment | Tip |
|---|---|---|---|
| Single (1lb) | Reduce by 30% | Reduce by 2-3 mins | Watch for dryness |
| Double (4lb) | Increase by 50% | No change | Cook in two layers |
| Triple (6lb) | Increase by 70% | Add 2-5 mins | Use 8 quart pot |
Scaling is mostly about the volume of liquid. The pressure stays the same regardless of the amount of meat, but the time to reach that pressure changes.
BBQ Myths Debunked
There's a common belief that searing meat "seals in the juices." Honestly, it doesn't. Moisture loss happens regardless of whether you sear or not. However, we still do it because the crust adds an incredible depth of flavor that you simply can't get from boiling or steaming.
Another myth is that you need to use "expensive" organic chicken for it to be tender. In reality, the pressure cooking process is a great equalizer. Even budget friendly cuts of chicken become velvety when treated with the right amount of pressure and acid.
Storing and Saving Leftovers
This dish is a meal prep dream. Store your leftovers in an airtight container in the fridge for up to 4 days. To reheat, I recommend a splash of water or extra BBQ sauce and a quick zap in the microwave, or a few minutes in a skillet to bring back some of that sizzle.
For the freezer, this lasts about 3 months. I like to freeze the shredded chicken already mixed with the sauce in portion sized bags. It's a lifesaver for quick lunches.
To keep things zero waste, don't throw away that leftover braising liquid if you didn't drain it all. It's basically a concentrated chicken and vinegar stock. You can freeze it in ice cube trays and toss a cube into your next pan of sautéed vegetables or a pot of soup for a hidden punch of acidity.
This is a great way to ensure nothing from your instant pot bbq chicken prep goes to waste.
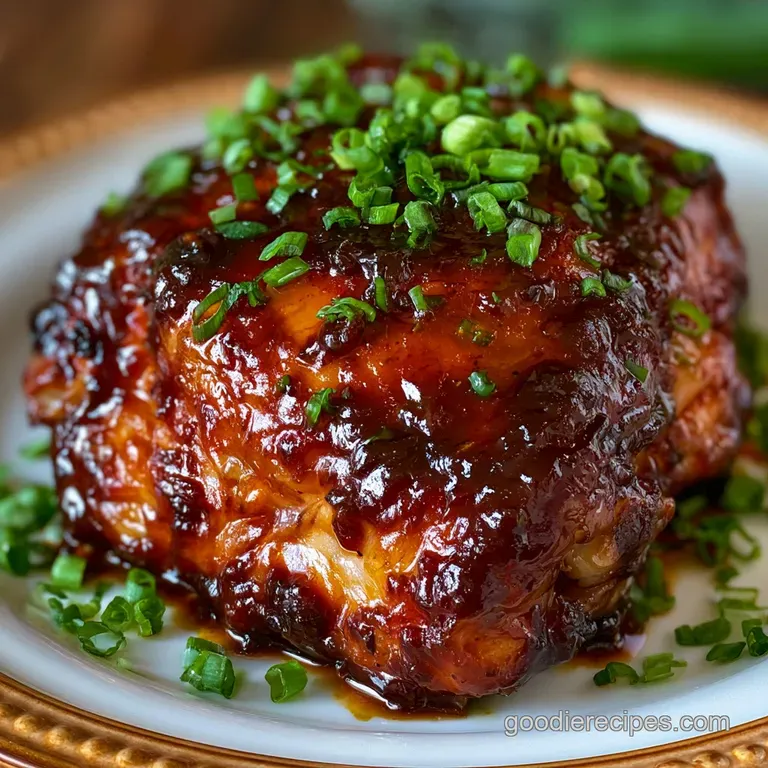
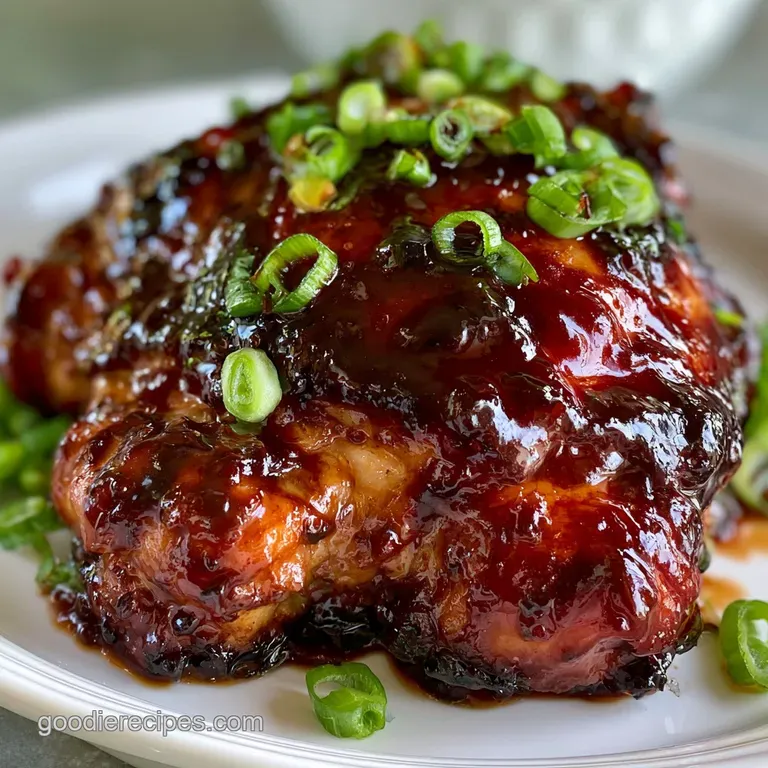
Plate It Like a Pro
For a family style meal, pile the chicken on a large platter and garnish with sliced green onions and a sprinkle of fresh cilantro. The bright green pops against the dark, glossy sauce.
If you're making instant pot bbq chicken sandwiches, toast your buns with a bit of butter first. Add a slice of sharp cheddar or provolone and let it melt under a broiler for 30 seconds before piling on the meat. Pair this with some homemade buttery crescent rolls for a full, comforting meal that feels like a celebration.
For a more modern twist, turn it into nachos. Spread tortilla chips on a sheet pan, top with the shredded chicken and plenty of Monterey Jack cheese, and bake at 400°F (200°C) for 5-7 minutes.
Top with pickled jalapeños and a drizzle of ranch dressing for a crowd pleaser that disappears in seconds.
High in Sodium
910 mg 910 mg of sodium per serving (40% 40% of daily value)
The American Heart Association recommends that most adults limit their sodium intake to no more than 2,300 mg per day to maintain heart health.
Tips to Reduce Sodium
-
Switch the Broth-30%
Replace standard chicken broth with low-sodium or unsalted chicken broth to significantly lower the base salt content.
-
Omit Added Salt-25%
Since the sauces already contain significant sodium, eliminate the 1/2 tsp of added salt from the seasoning rub.
-
Choose Low-Sodium BBQ Sauce-20%
Swap the standard BBQ sauce for a low-sodium version or make a homemade version using tomato paste and spices.
-
Reduce Worcestershire Sauce-20%
Reduce the amount of Worcestershire sauce or replace it with a splash of apple cider vinegar for a similar tang.
-
Enhance with Aromatics
Add fresh lemon juice, minced garlic, or fresh parsley to brighten the flavors without adding any extra sodium.
Recipe FAQs
Can you cook barbecue chicken in an Instant Pot?
Yes, it is one of the fastest ways to get tender, shredded meat. Searing the chicken first and using pressure ensures the meat stays juicy while absorbing the tangy flavors.
Do you put barbecue sauce on chicken before or after pressure cooking?
Add the sauce after the chicken is cooked and shredded. Stirring the BBQ sauce in during the final sauté step prevents the sugar from burning and creates a thicker, glossier glaze.
Why is my chicken rubbery in the Instant Pot?
Overcooking is the most likely cause. Stick to exactly 10 minutes for breasts and allow a full 10-minute natural pressure release to keep the proteins tender.
Do you need liquid in an Instant Pot for chicken?
Yes, liquid is required to build pressure. A combination of chicken broth and apple cider vinegar provides enough moisture to prevent the burn notice.
Can I use chicken thighs instead of breasts?
Yes, thighs are a great alternative for more flavor. Increase the pressure cook time to 15 minutes. If you enjoy these hearty protein portions, see how we manage large quantities in our creamy chicken tetrazzini.
How to store leftover BBQ chicken?
Place the chicken in an airtight container in the fridge. It stays fresh for up to 4 days or can be frozen in portion sized bags for up to 3 months.
Is it true that adding BBQ sauce before pressure cooking is the best method?
No, this is a common misconception. The high sugar content in most sauces often triggers the burn notice; it is safer and more effective to stir it in at the end.
Instant Pot Bbq Chicken

