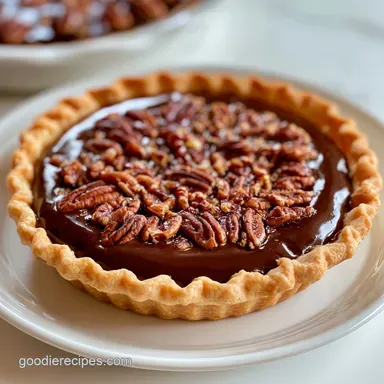
Decadent Chocolate Nut Pie with Wafer Crust

- Total7 Hrs 50 Mins
- Servings8 slices
- Calories629 kcal
- Time: 20 min active + 15–30 min crust freezer chill + 60 min baking + 6 hrs cooling/chilling
- Flavor & Texture: Fudgy, dense center with a crunchy chocolate base
- Perfect for: Holiday dinner parties or a fancy weekend treat
Rich and Fudgy Chocolate Nut Pie
Imagine the sound of a chocolate wafer crust cracking under a fork. This pie delivers a dense, fudge-like center that hits that spot between a traditional pecan pie and a rich chocolate torte. It is heavy on the cocoa and crunch, making it a great choice when you want something more substantial than a standard cake.
You can expect a deep, dark filling that stays stable once chilled. Because we use toasted nuts and a bit of coffee, the sweetness doesn't feel overwhelming. It tastes like a high-end candy bar in pie form.
The goal here is a center that is set but not stiff. If you bake it until the middle is hard, you lose that fudgy quality. We rely on the fridge to do the heavy lifting for the final texture.
Quick Recipe Specs
This bake uses a standard oven at 350°F (180°C). You'll need a 9-inch pie pan to get the proportions right. Total time is dominated by the wait, as the pie needs at least 6 hours of resting before you cut into it.
Check for doneness by gently shaking the pan. The outer edges should be puffed and set, while the center maintains a slight jiggle. This is the point where you pull it out to avoid a dry, overbaked filling.
The Ingredients List
For the crust, we use chocolate wafers to double down on the cocoa. The filling relies on corn syrup and eggs to create that specific, chewy density.
- 1½ cups chocolate wafer crumbs Why this? Provides a dark, cocoa-flavored base
- 5 tbsp unsalted butter, melted Why this? Binds the crumbs together
- 1 tbsp granulated sugar Why this? Adds a hint of sweetness to the crust
- 1 cup packed light brown sugar Why this? Gives the filling a molasses depth
- ½ cup all-purpose flour Why this? Provides structure to the custard
- ¼ tsp salt Why this? Balances the rich chocolate
- 3 large eggs Why this? Binds and lifts the filling
- ½ cup light corn syrup Why this? Creates the chewy, fudgy texture
- 6 oz semi-sweet chocolate, melted Why this? The primary flavor driver
- 2 tbsp strong brewed coffee Why this? Intensifies the chocolate notes
- 1½ cups toasted pecans or walnuts, roughly chopped Why this? Adds crunch and earthy flavor
| Original Ingredient | Substitute | Why It Works |
|---|---|---|
| Pecans (1½ cups) | Walnuts (1½ cups) | Similar fat content and crunch. Note: Walnuts have a slightly more bitter skin |
| Semi-sweet Chocolate | Dark Chocolate (60%) | Higher cocoa content. Note: Results in a less sweet, more intense pie |
| Chocolate Wafers | Graham Crackers | Neutral base. Note: Lose the chocolate crust flavor, add 2 tbsp cocoa powder |
Essential Kitchen Tools
You don't need fancy gear, but a 9-inch pie pan is mandatory. Use a baking sheet to place under the pan, as this catches any stray drips and makes it easier to move the pie in and out of the oven. A whisk and a large mixing bowl will handle the filling.
Putting It Together
For the Chocolate Cookie Crust
Heat your oven to 350°F (180°C). In a mixing bowl, combine 1½ cups chocolate wafer crumbs, 5 tbsp melted unsalted butter, and 1 tbsp granulated sugar. Press the mixture firmly into the base and up the sides of a 9-inch pie pan, using a flat-bottomed glass to pack it down tightly.
Chill the crust in the freezer for 15 to 30 minutes to firm up the edges.

For the Nut Filling
In a large bowl, whisk together 1 cup packed light brown sugar, ½ cup all-purpose flour, and ¼ tsp salt. In a separate container, lightly beat 3 large eggs, then stir in ½ cup light corn syrup, 6 oz melted semi-sweet chocolate, and 2 tbsp strong brewed coffee.
Slowly pour the wet ingredients into the dry mix, whisking until the batter is smooth. Toast 1½ cups pecans or walnuts in a dry skillet over medium heat for 5–8 minutes until they smell fragrant and look darker. Coarsely chop the nuts and fold them into the chocolate mixture.

For the Final Set
Transfer the filling into the chilled crust. Place the pie pan on a baking sheet and bake for 50–60 minutes. It is finished when the edges are set and slightly puffed, though the center should still have a slight jiggle.
Remove it from the oven and let it cool on a wire rack at room temperature for 2 hours. Finally, move the pie to the refrigerator to chill for at least 4 hours or overnight.

Avoiding Common Pitfalls
Fixing a Soggy Bottom
If the crust feels soft, the crumbs weren't pressed hard enough. Use the bottom of a measuring cup to pack them tightly next time. You can also blind-bake the crust for 8 minutes before adding the filling to create a barrier.
Preventing a Cracked Top
Overbaking is the main cause of surface cracks. Pull the pie out while the center still jiggles. The carryover heat will finish the set without drying out the top.
Stopping Runny Slices
If the pie doesn't hold its shape, it likely hasn't chilled long enough. This filling is high in fat and sugar, so it needs a full 4 hours in the fridge to solidify. If it's still soft, give it another 2 hours.
Fun Flavor Twists
To achieve a warmer, spicier flavor, I suggest mixing a dash of cinnamon into the flour. For those who enjoy a savory contrast, add a light dusting of sea salt as soon as the treats leave the oven.
You can also swap the nuts for a combination of pecans and hazelnuts. Hazelnuts provide a rich, buttery essence that complements the melted chocolate perfectly. Be sure to toast them beforehand; otherwise, their flavor may seem too raw compared to the deep cocoa.
Keeping It Fresh
Seal the pie tightly with foil or store it in an airtight container. It will remain fresh for a maximum of 4 days when kept in the refrigerator.
This pie is freezer-friendly. Wrap the cooled pie in plastic wrap and then a layer of foil. Keep it in the freezer for up to 1 month. To defrost, let it sit in the refrigerator for roughly 6 hours before serving.
For a warm slice, use an oven set to 300°F (150°C) to heat a single piece for 5–10 minutes.
The Best Serving Tips

To achieve the neatest slices, warm a sharp knife in hot water and wipe it clean after each cut. This keeps the thick filling from dragging.
Since the texture is very rich, I suggest serving each piece with some unsweetened whipped cream or a few fresh raspberries. The tartness of the berries balances the richness of the chocolate and nuts.
Why the Method Works
The Coffee Boost: Coffee doesn't make the pie taste like mocha. It actually makes the chocolate taste more like chocolate by enhancing the cocoa notes.
Two-Stage Cooling: Cooling at room temperature first, then chilling, prevents the filling from shrinking. This ensures the center stays attached to the crust for a velvety finish.
High in Sodium
875 mg of sodium per serving (38% of daily value)
American Heart Association recommendation: no more than 2,300 mg of sodium per day
Tips to Reduce Sodium
-
Omit Added Salt
Remove the ¼ tsp of salt entirely, as the other ingredients provide enough flavor to maintain the taste profile.
-
Check Wafer Crumbs
Look for low-sodium chocolate wafers or create a homemade crumble to avoid the processed sodium and leavening agents found in commercial wafers.
-
Swap the Chocolate
Use a high-percentage dark chocolate instead of semi-sweet, as dark chocolate typically contains fewer additives and less sodium.
-
Verify Unsalted Nuts
Ensure the pecans or walnuts are raw and unsalted to eliminate hidden sodium from roasting salts.
-
Boost Natural Aromatics
Add a teaspoon of pure vanilla extract or a pinch of cinnamon to enhance the richness and depth of flavor without adding salt.
Your Questions, Answered
Why won't the slices hold their shape, and how long must the pie rest or chill?
The pie needs a full chilling period to firm up the dense custard. Let it cool at room temperature for 2 hours and then refrigerate for at least 4 hours or overnight.
How do I get clean, neat slices without the filling dragging?
Chill the pie completely before cutting to ensure the filling is stable. Use a sharp knife and wipe the blade clean between every slice.
What indicates the center is set enough to avoid overbaking?
Look for puffed edges and a slight jiggle in the middle when the pan is gently shaken. This ensures the filling stays fudgy rather than becoming dry.
Can I bake this pie in a metal pan instead of a glass or ceramic one?
Yes, a metal pan works well for this recipe. Metal conducts heat faster, so keep a close eye on the crust edges to prevent over-browning.
Chocolate Nut Pie with Wafer Crust
Ingredients:
Instructions:
You May Also Like

Classic Pumpkin Pie: Silky and Baked
Master the classic pumpkin pie with this velvety recipe. Make a homemade pumpkin pie from scratch…

Baked Pumpkin Doughnuts
Spiced and fluffy Baked Pumpkin Doughnuts. Includes a table with the role of each ingredient and…

Classic Cheesecake with Sour Cream: Creamy Baked Dessert
Master our Classic Cheesecake recipe with a silky filling and buttery graham cracker crust.
